OCA Spaces Support & Guidance
| Site: | OCA Learn |
| Course: | Tech Support, Guidance & Workshops |
| Book: | OCA Spaces Support & Guidance |
| Printed by: | Guest user |
| Date: | Wednesday, 6 May 2026, 4:49 PM |
Description
This activity contains support and guidance regarding the use of OCA Spaces, including how to access and sign in, creating a new learning log and subsequent blog posts, to more intermediate and advanced features available.
Getting Started
Use the chapters available on the left to navigate to a specific topic, or read through the entire activity for a broader overview of OCA Spaces.
All information and guidance available throughout this activity is accurate and correct of November 22nd 2022.
Once complete, please provide feedback, request additional guidance or report mistakes using the Tech Support, Guidance & Workshops Feedback activity.
Signing into OCA Spaces
Prior to accessing and signing into OCA Spaces, you'll first need to sign into your OCA email account; please visit the Google Support & Guidance section for more information on this process.
Upon signing into your OCA email account, you can access the OCA Spaces homepage and select the blue 'Sign in with OCA email' option, as highlighted in red in the screenshot below.

Selecting this option whilst signed into your OCA email account will sign you in automatically. In the event you're signed into multiple Google accounts and aren't using separate Google Chrome Profiles - as suggested in the Google Support & Guidance section - you'll need to select your OCA account from a list of signed in users; see the screenshot below for example. Providing you're signed into your OCA email account, at no stage do you need to manually enter your login details when signing into OCA Spaces.

Below is a screenshot demonstrating the OCA Spaces homepage once signed in.

Creating a new Learning Log
Prior to creating a new learning log, you'll first need to sign into OCA Spaces.
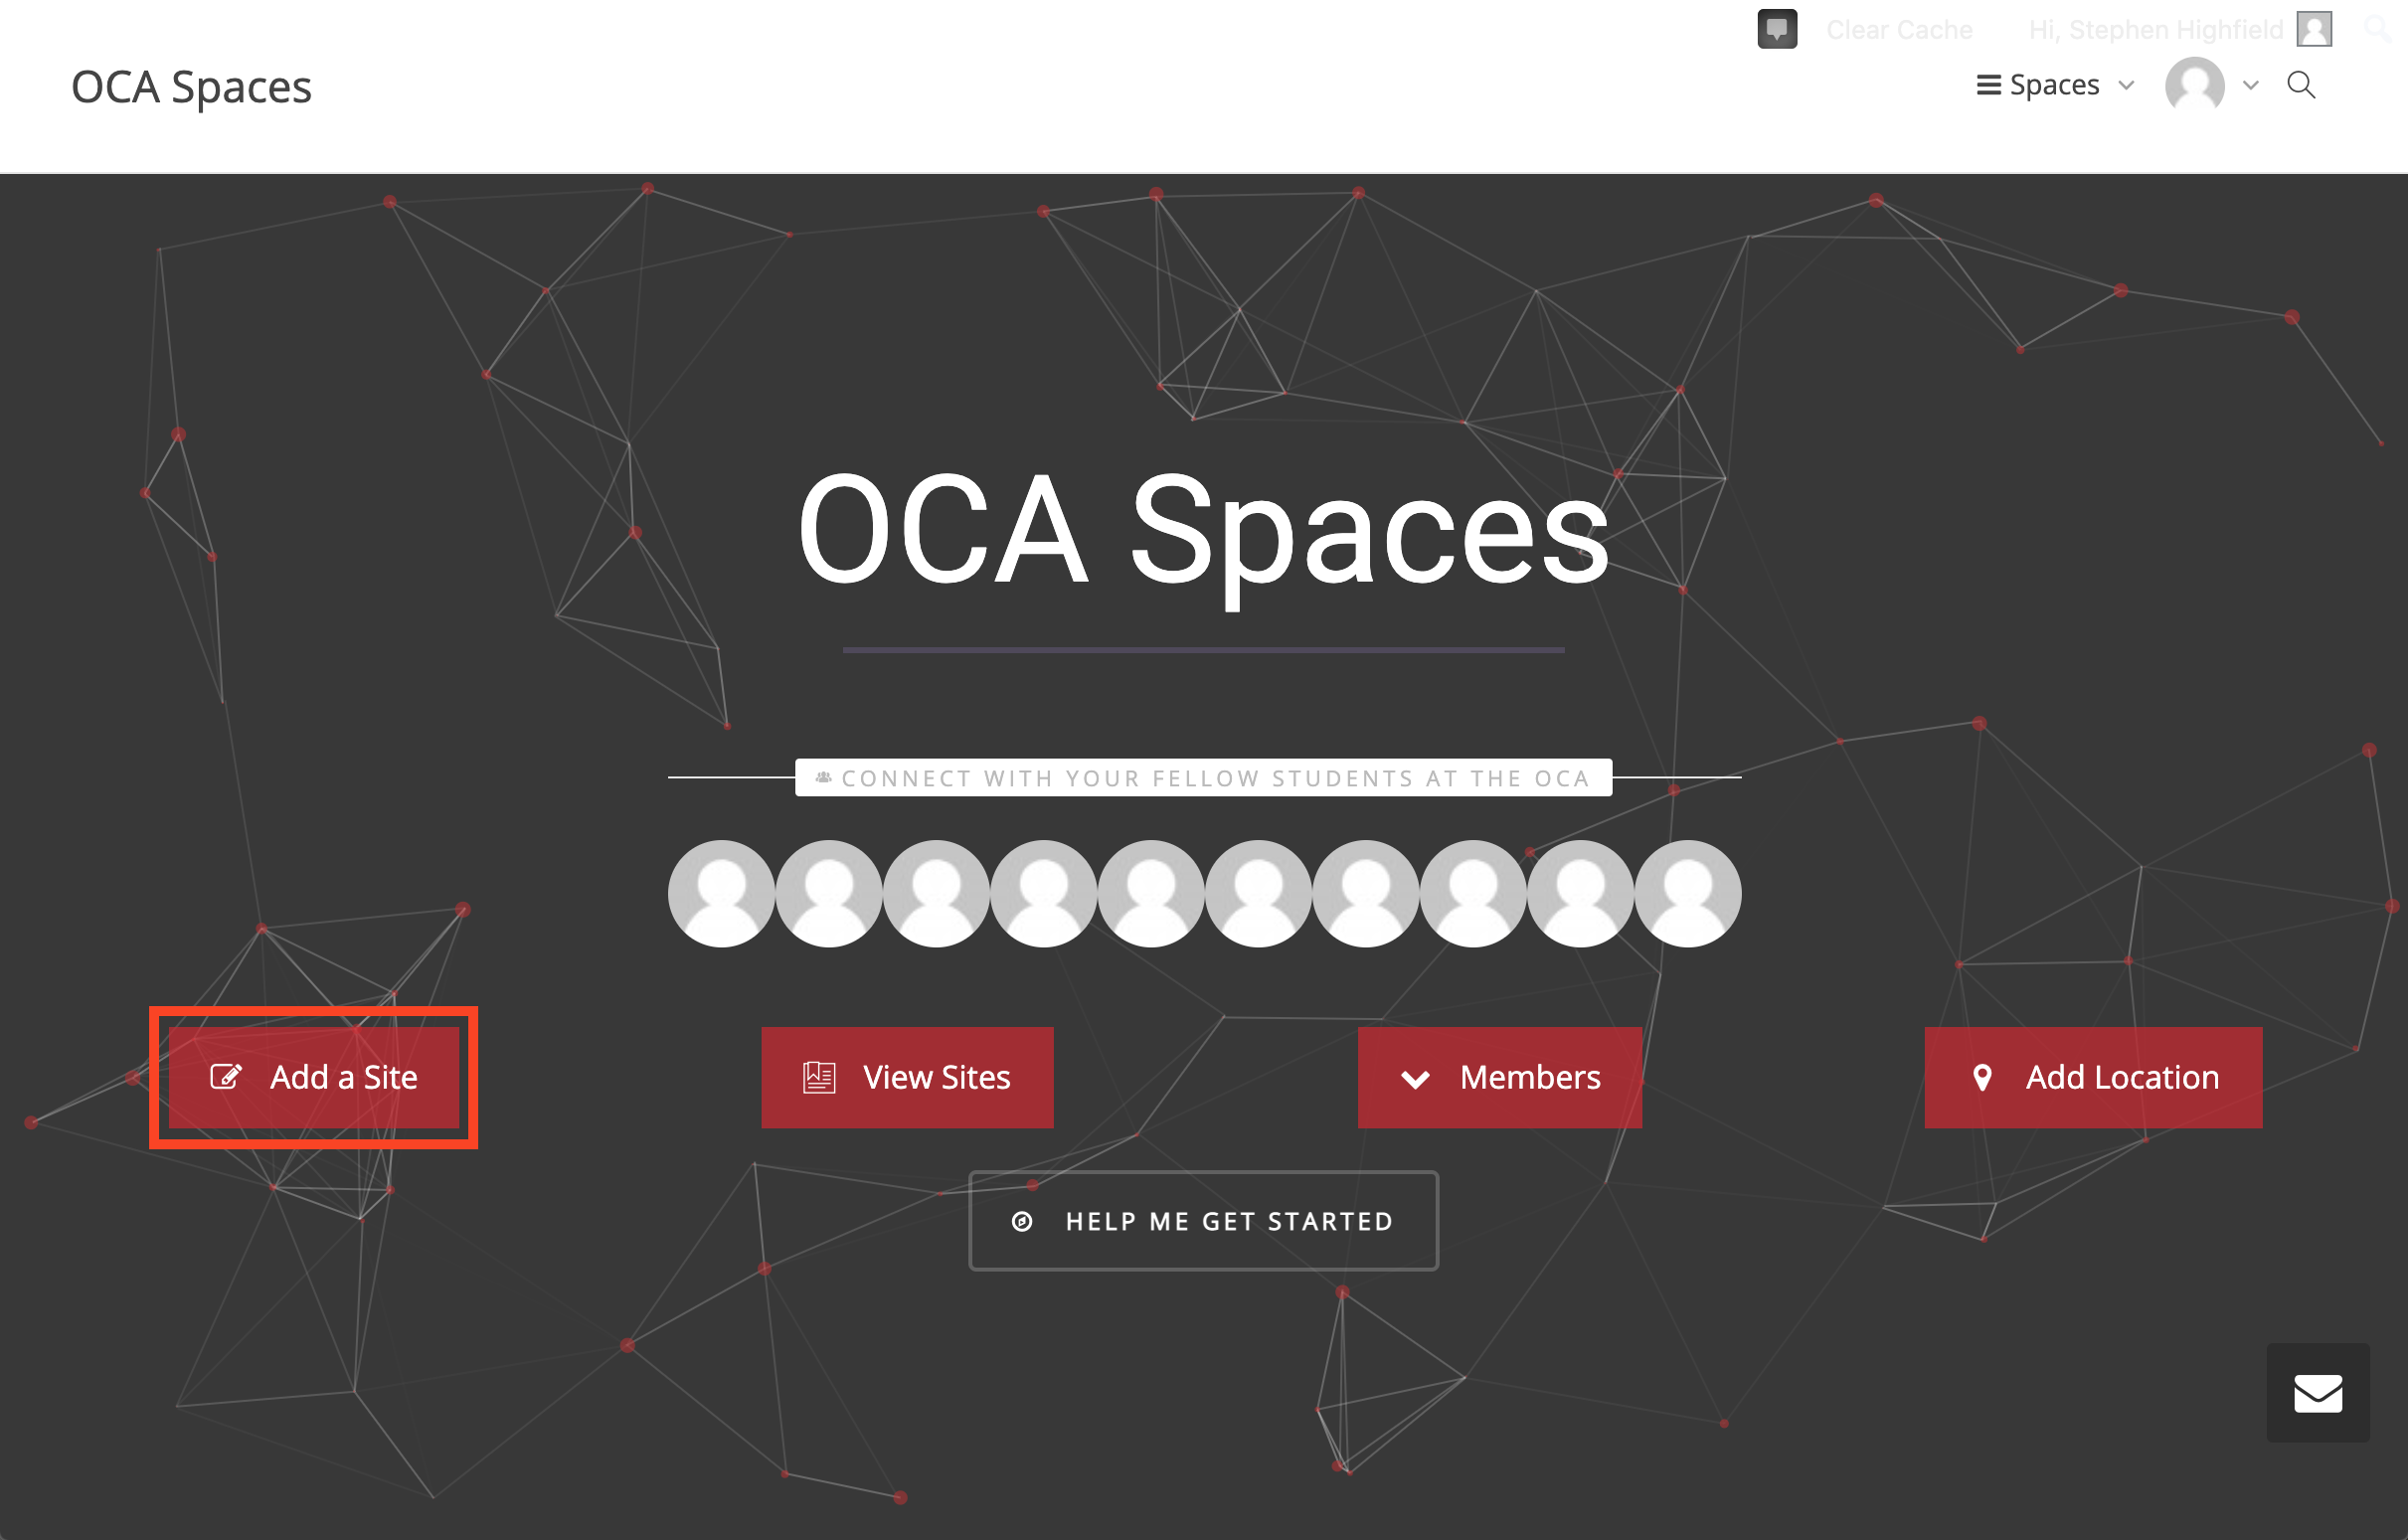
Upon signing into OCA Spaces, you can select the 'Add a Site' option, located on the left of the OCA Spaces homepage and as highlighted in red in the screenshot below.
Upon selecting this option, you'll need to complete the following options as outlined below;
Site Name
For information regarding the importance of your site name, please refer to the Site Name description. In this one particular field, only lowercase characters and numbers are permitted, spaces ( ), uppercase characters and symbols are prohibited. You may wish to replace any spaces ( ) with a hyphen (-). Any error you receive when creating your blog likely includes either of these three validations.
Site Title
The title of your learning log and recommended to include the course unit, although like the site name, this is entirely at your discretion.
Privacy
The privacy setting affects who can access your blog, and The TEL Team recommends selecting the ‘Visible only to registered users of this network’ option. Selecting this option allows anyone with an OCA email account, including your tutor and fellow students, to access your blog.
If you’d rather your blog be available to everyone on the internet, select either the appropriate ‘Yes’ or 'No' option. For more information on the remaining options, or to find information on how to change your blog's privacy setting at a later date, please visit the Privacy Settings sub-chapter.
Template
Finally, you’ll need to select the template most appropriate to your course unit. Students studying a Post-Periodic Review (PPR) course - often identifiable by the ten projects in the course contents - should select the 'HE4/5/6 (Level 1/2/3) 21/22 Template'. Additionally, some courses, for instance Music and Fine Art, have custom created templates.
Upon entering your preferred settings, you can then select the 'Create Site' option to complete the process.
Students are also encouraged to create an experimental test site, which can be used to experiment with different options, settings and process while safe in the knowledge any unexpected changes won't impact your learning log. Anyone who does wish to create a test site can do so following the above process.
Accessing & Linking your Learning Log
Accessing your Learning Log
Upon creating your learning log, there are three methods in which you can later access it;
- From the OCA Spaces homepage, you can hover over the profile icon - located in the upper right corner - and select the ‘My Sites’ option from the dropdown menu. On the following page you’ll then find a list of your site(s). Selecting any of the listed sites will take you to your learning log homepage; the equivalent of selecting the ‘Visit Site’ option as outlined below.
- Alternatively, from any page within OCA Spaces, you can hover over the ‘My Sites’ option - located in the upper left corner - subsequently hover over the name of your site, and select either;
- Visit Site: Selecting the ‘Visit Site’ option will allow you to access your learning log homepage, like your tutor or fellow student would do, for instance. The outcome is also identical to following step one.
- Dashboard: Selecting the ‘Dashboard’ option will take you to the WordPress Dashboard.
- Lastly and the quickest option to access your learning log would be to enter your learning log domain name in the address bar. This will consist of spaces.oca.ac.uk/[Site Name]. You may also wish to bookmark this address for quick access in the future.
Linking your Learning Log
There are likely several instances where you’ll need to provide a link to your learning log, such as when submitting an assignment or providing access to a fellow student, for instance.
To provide a link to your learning log, first follow either step 1 or 2a as outlined above. Upon accessing your learning log from the frontend and providing your blog posts are appropriately categorised, you can then copy the entire URL. In the event your blog posts aren’t categorised - which the TEL Team highly recommends against - you may wish to navigate to the appropriate blog post(s) and copy the entire URL.
A domain name should take the following format; spaces.oca.ac.uk/[Site Name] and/or spaces.oca.ac.uk/[Site Name]/[[Category]/[Sub-Category]/[Post Title]. For example; spaces.oca.ac.uk/example-learning-log/assignments/assignment-3/example-blog-post.
Links to pages within the WordPress Dashboard, and identifiable by "/wp-admin" in the URL, will be inaccessible to anyone other than yourself, and should therefore not be sent to others.
Creating a new Blog Post
When creating a new blog post, students will need to use the following editor;
Gutenberg Editor: Often considered the more difficult of the two editors, but offers greater functionality and more creative capabilities. Features such as tables, inserting or embedding videos and HTML anchors are all available when using this editor.
Please note that when creating a blog post, you’re free to use whichever editor you prefer and feel comfortable with, however, it should be noted that the two aren’t entirely compatible, and should you need to later edit the post, the TEL Team recommends continuing to use the same editor used when initially creating the blog post. You are, however, able to alternate between the two editors when creating a new blog post.
Gutenberg Editor
This sub-chapter is broken down into several headings;
Gutenberg Editor Explained
The Gutenberg editor, also known as the “Block Editor”, uses a combination of diverse multimedia blocks, metaphorically similar to LEGO. Each of the available block types provide different capabilities and support for different media types, such as text, images or video, and when combined together can be used to construct your blog post.
The screenshot below illustrates the contents of a typical blog post and how the content is constructed using the various block types.

Accessing the Gutenberg Editor
To access the Gutenberg Editor, you’ll first need to access the WordPress Dashboard, as outlined in step 2b of the Accessing your Learning Log section.
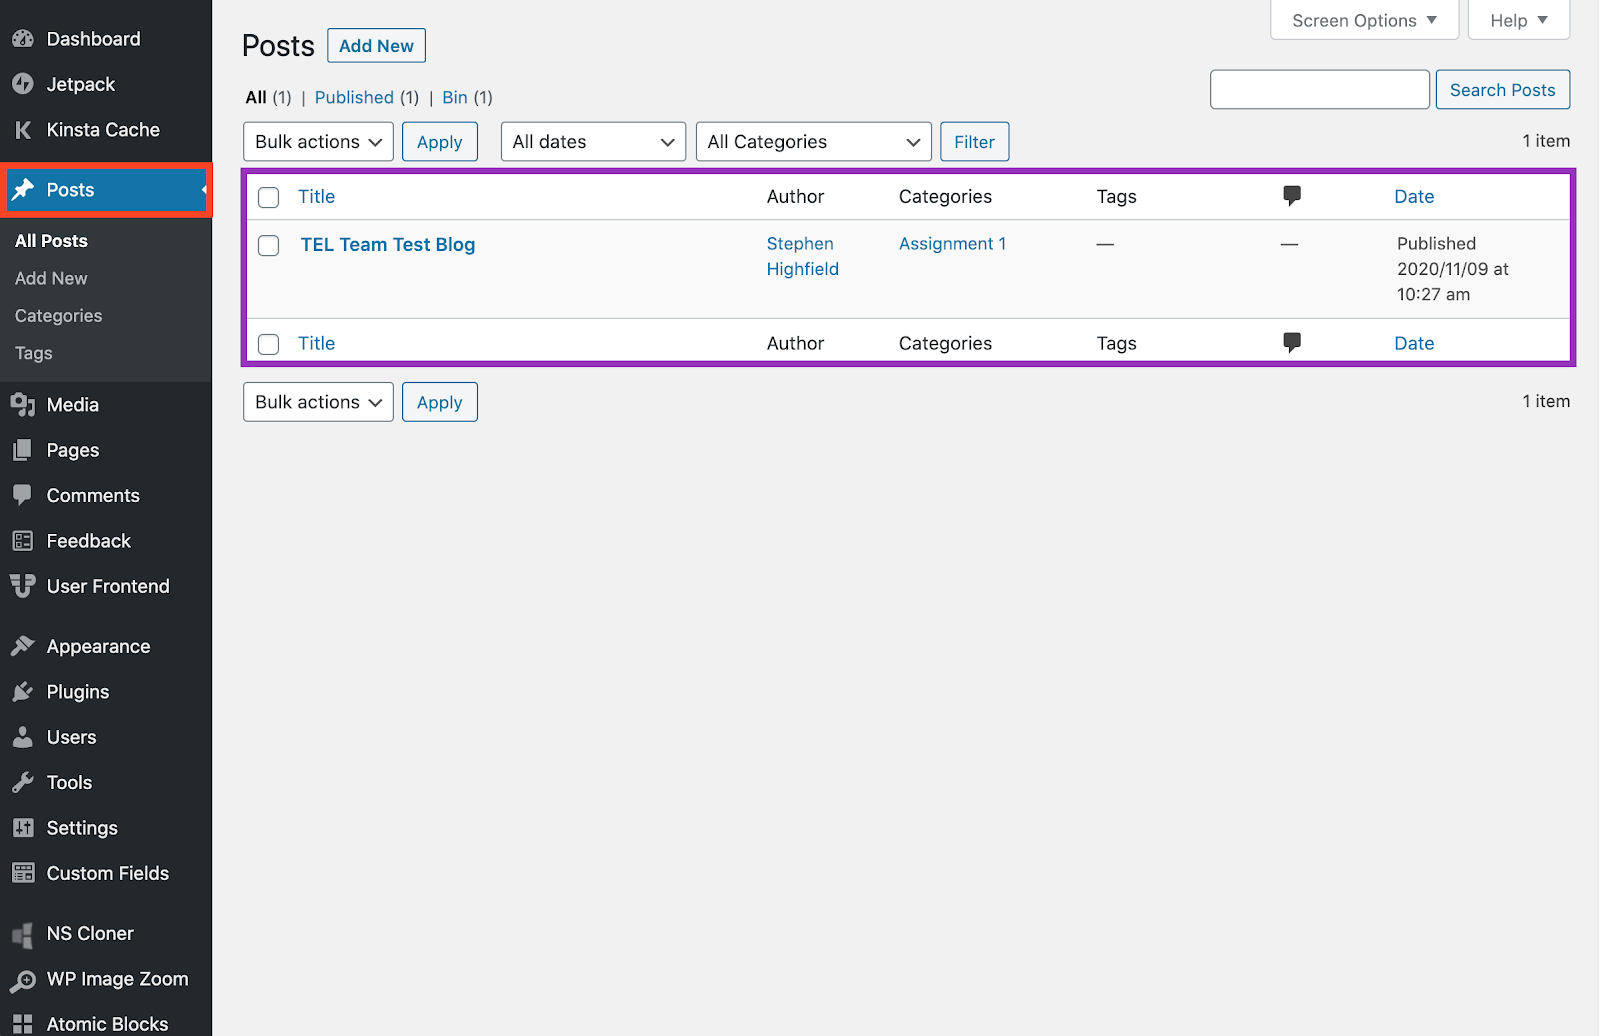
Upon accessing the WordPress Dashboard, you’ll then need to select the ‘Posts’ option, located in the left hand menu and as highlighted in red in the screenshot below. Selecting this option, and as highlighted in purple, you’ll be able to access any existing blog posts, including those created using the frontend editor.
Additionally, you can also select either of the ‘Add New’ options, as highlighted in red in the screenshot below, to create a new blog post. Accessing an existing or creating a new blog post from the WordPress Dashboard and following this method will use the Gutenberg editor.
![The 'Posts' interface with the 'Add New [Post]' option highlighted in red.](https://learn.oca.ac.uk/pluginfile.php/51558/mod_book/chapter/2534/Gutenberg%20Editor%20-%20New%20Post.png)
Gutenberg Editor Interface
The following interactive Gutenberg Editor Interface activity provides information on the various applicable options available whilst using the Gutenberg editor. Begin by selecting any of the 'i' icons to find out more information about a specific option.
Using the Gutenberg Editor
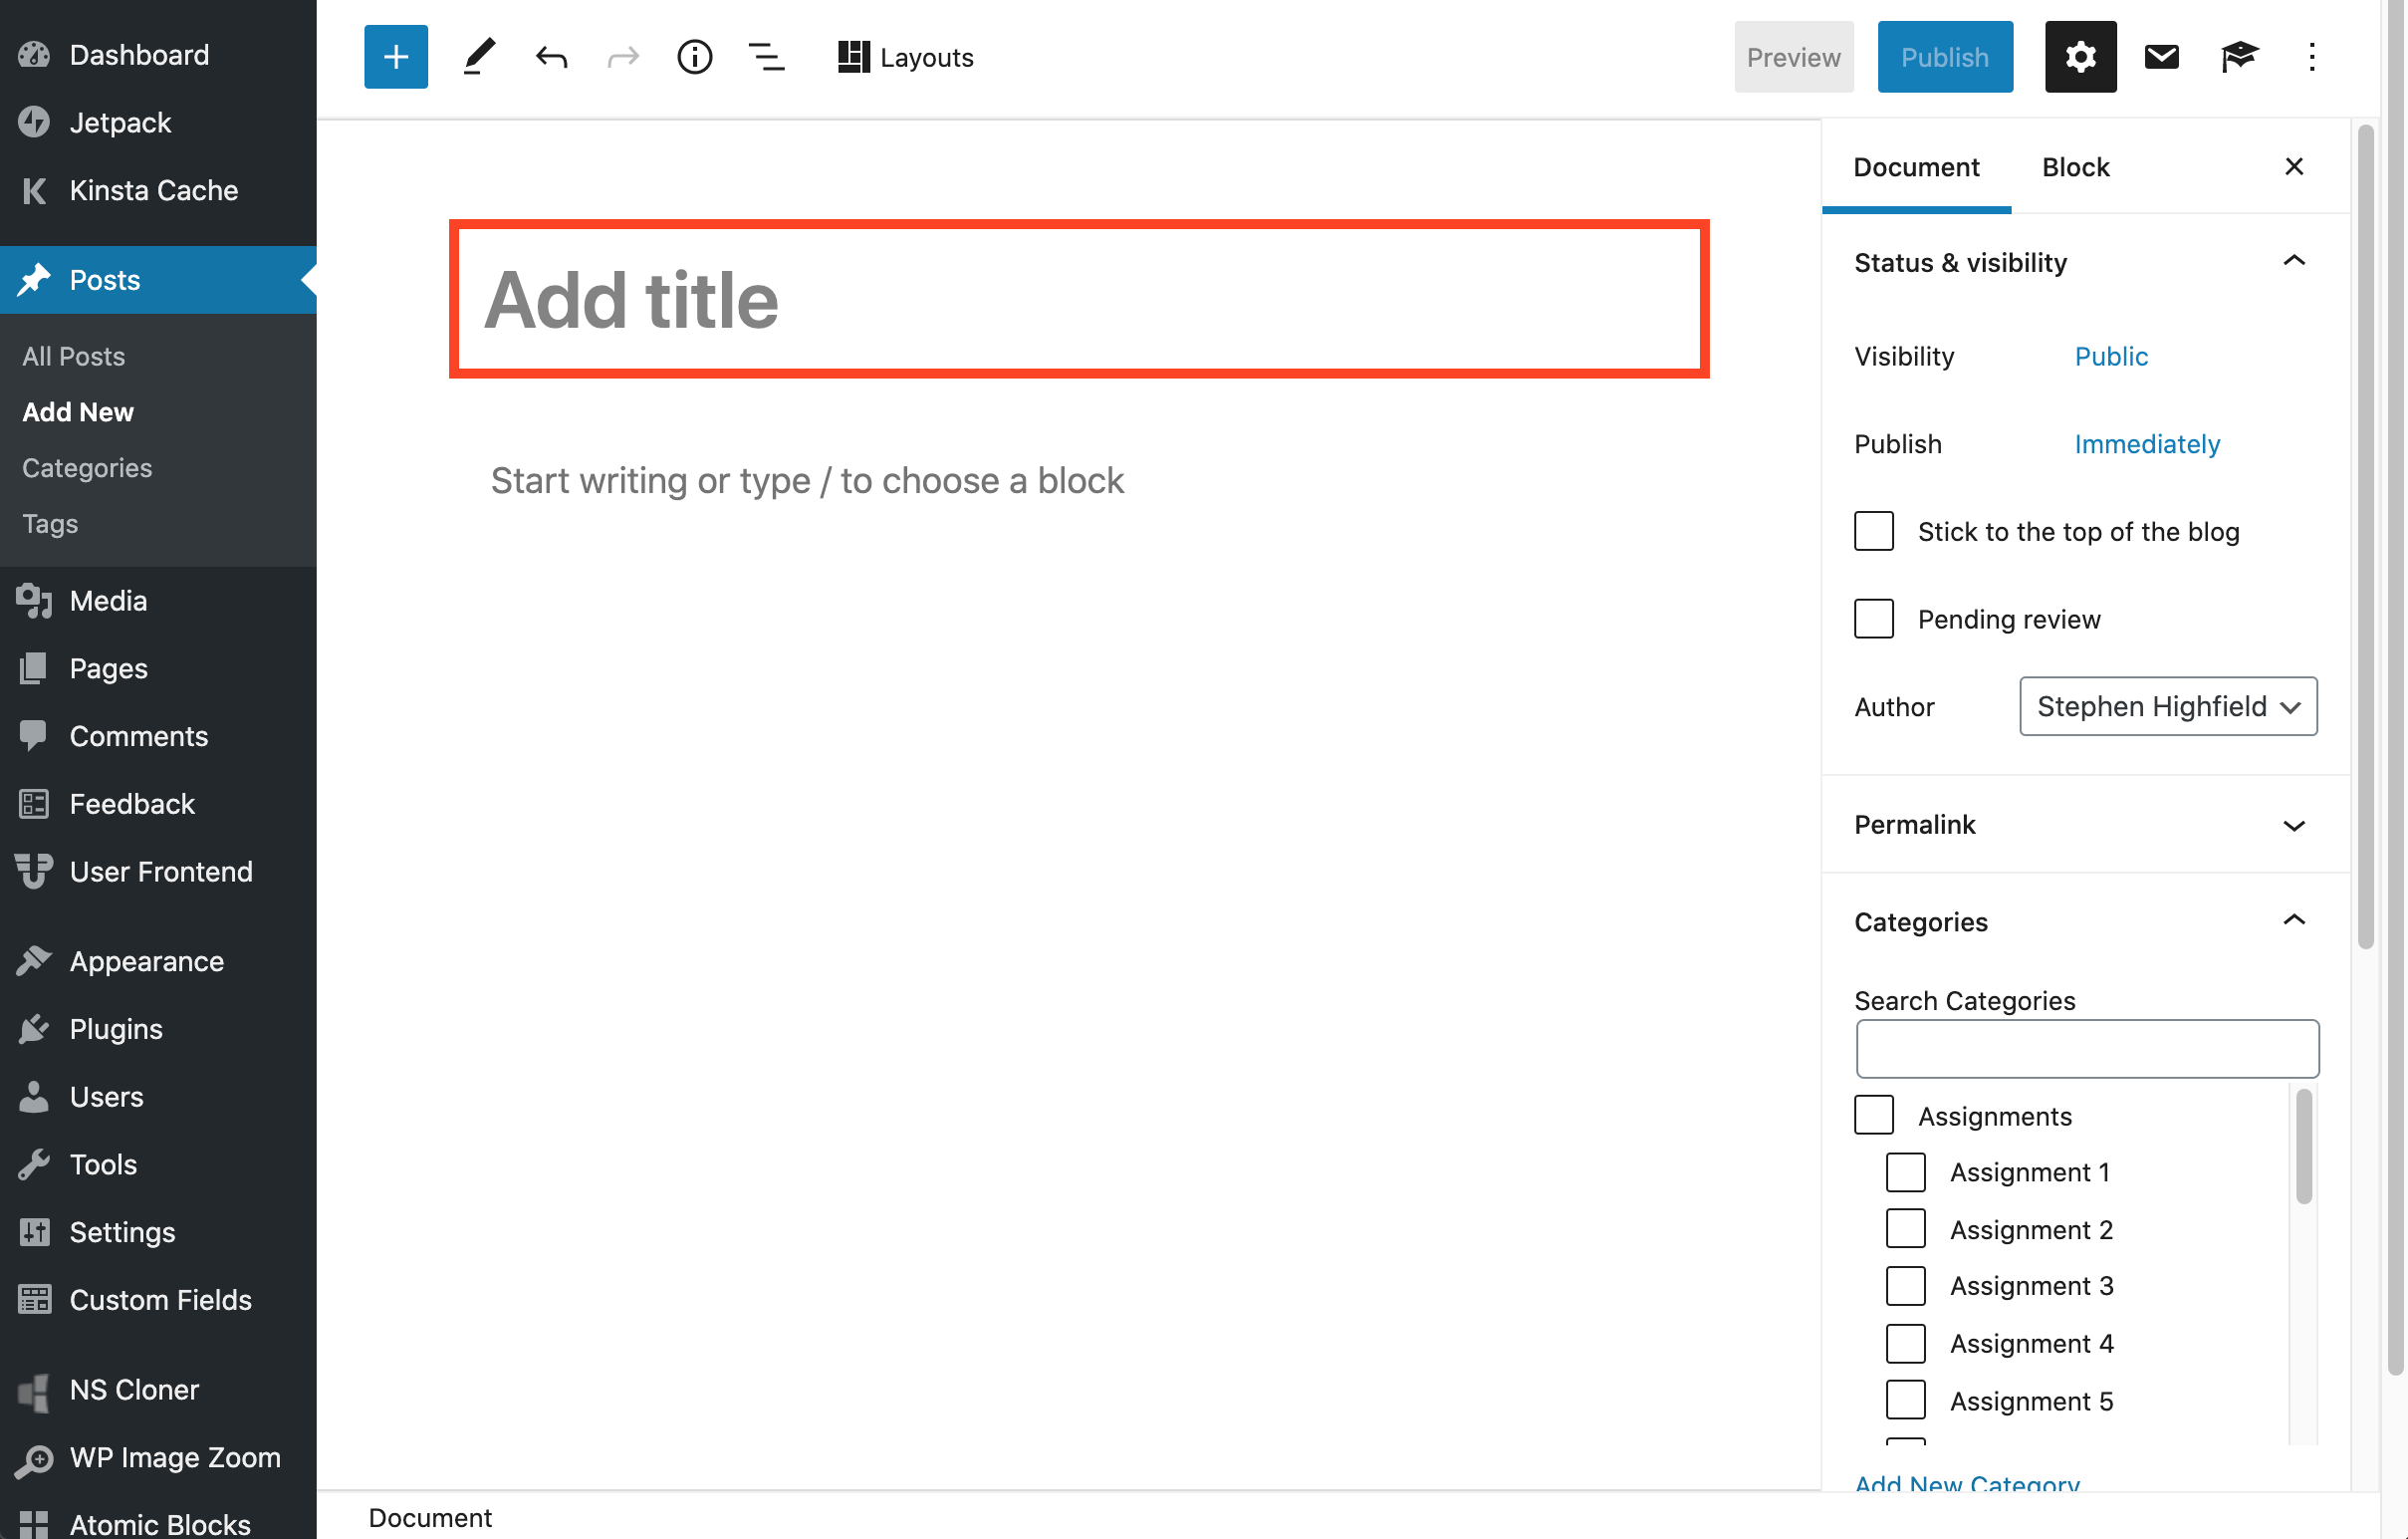
Upon Accessing the Gutenberg Editor, you’ll first need to title your post by replacing the ‘Add title’ text, as highlighted in the screenshot below.
After adding a title, you can then use the default paragraph block, highlighted in the screenshot below, to begin adding text to your blog post, however, this can be changed or removed, and/or subsequently added to as explained below;

Blocks
Adding a new block
While there are multiple ways to add a new block, the TEL Team would recommend that beginners begin by selecting the blue ‘+’ icon, located in the upper left corner. Selecting the ‘+’ icon will open the block menu, where you can hover over a particular block to find out more information, such as its capabilities and supported media, before selecting it to add the block to your post. For more information on the various blocks available, please visit the Block Types sub-chapter.
The screenshot below indicates the aforementioned blue '+' icon, highlights the more common block types and provides an example block description.

Alternative methods to adding a new block include pressing the enter key on your keyboard or by selecting the black '+' icon that appears to the right of any 'Paragraph' block when selected.
Block Types
The Gutenberg editor offers several block types, the majority of which are unlikely to be applicable to OCA Students, and the TEL Team have therefore explained the capabilities and use case for some of the more common block types below;
- Paragraph: Paragraph text entry and the default block, best suited for adding standard paragraph text.
- Heading: Heading text entry with several enlarged heading fonts, best suited for creating headings and/or sub-headings.
- List: Used to create bullet pointed and/or numbered lists.
- Image: Supports a single image upload.
- Gallery: Supports multiple images in an organised and optionally smaller format. The only block type to support images which can be enlarged and viewed at their native resolution when selected; for information on this process can be found in the Enlarging Images sub-chapter.
- Media & Text: Supports media, such as an image, to appear alongside text.
- File: Supports the upload, display and download of a file, such as a PDF document, for example.
Deleting a block
To delete a block, first select the appropriate block, followed by the backspace key on your keyboard or by selecting the ‘Additional Options’ option, as explained in the Gutenberg Editor Interface sub-chapter, followed by ‘Remove [block type]’.
Changing the block type
In the instance you want to change the block type, for instance, you’d like to convert a ‘Paragraph’ block into a ‘Heading’ block, first select the appropriate block followed by the ‘Convert To’ option, as explained in the Gutenberg Editor Interface sub-chapter
Rearrange blocks
To move or rearrange a block(s), first select the appropriate block followed by either of the ‘Move Up’ and/or ‘Move Down’ options, as explained in the Gutenberg Editor Interface sub-chapter
Categorising a blog post
Having completed your post and prior to publishing, the TEL Team strongly recommends categorising your blog post.
Categorising your blog post helps ensure that those accessing your learning log, and particularly your tutor, are able to use the menu to find the relevant post(s). When left uncategorised, your post will only be available on your learning log homepage alongside all other blog posts.
To categorise your blog post, select the ‘Settings’ (Cog) icon, located in the upper right corner and as explained in the Gutenberg Editor Interface sub-chapter, followed by the ‘Categories’ dropdown menu. Within the ‘Categories’ dropdown menu, you can then select the relevant category(s). When selecting a sub-category, such as ‘Assignment 3’, the TEL Team also recommends selecting the relevant parent category, in this instance, ‘Assignments’.
The screenshot below demonstrates the process of categorising your blog post.

Publishing a blog post
Having successfully constructed and categorised your blog post, it’s finally time to publish it and make it available to everyone. You can publish your blog post by selecting the blue ‘Publish’ option, located in the upper right corner and as explained in the Gutenberg Editor Interface sub-chapter.
When publishing your post, the TEL Team strongly recommends leaving your post privacy setting as ‘Public’, and anything besides this option will restrict your tutor - and anyone else accessing your learning - from accessing this particular post.
Additional Features
Font Colours
Available within the Gutenberg editor and with any text based block, such as a ‘Paragraph’ or ‘List’ block selected, there are two font colour options available;
- Selecting the ‘Settings’ (Cog icon) - located in the upper right corner - followed by the ‘Colour’ dropdown menu and the ‘Text’ option, can be used to change the colour throughout the entirety of the selected block.
- Alternatively and to change the colour of a specific word, phrase or sentence, select the appropriate text followed by the ‘Additional Font Options’ (South facing arrow) - as demonstrated in the Gutenberg Editor Interface sub-chapter - followed by ‘Highlight’.
In both instances, a custom colour can be selected by selecting the transparency indicator. However, custom colours cannot be saved to the default colour palette, and the TEL Team would therefore recommend making note of your chosen colours HEX code, should you wish to use the same colour throughout your blog post(s).
HTML Anchors
HTML anchors can be used to link to a specific section or heading, either within the same or a different blog post, an example of this would be the sub-chapters, linked at the top of this chapter. HTML anchors can be particularly useful when wanting to cite or reference a specific section within one of your blog posts.
To create a HTML anchor, first access the blog post in which you’d like to link to. Upon accessing the appropriate blog post, then select the block that you’d like to specifically link to, followed by the ‘Settings’ (Cog) icon - as explained in the Gutenberg Editor Interface sub-chapter - and finally the ‘Advanced’ dropdown menu. Within the ‘HTML anchor’ field, enter an anchor ID; the ID isn’t important although you will need to remember it for the following step; it also must not include any spaces. Complete this first step by ‘Updating’ or ‘Publishing’ your blog post.
Having created the HTML anchor, we now need to create a link to it. Do this by navigating to the appropriate blog post - assuming you’re not linking within the same post, and in which case you can continue working within the same post - and highlight the appropriate string of text that you’d like to link from. With the appropriate string of text highlighted, you’ll then need to select the ‘Link’ option, as explained in the Gutenberg Editor Interface sub-chapter.
If you’re creating a link within the same blog post, in the ‘Link’ window, enter “#” followed by the anchor ID, for instance, “#Example”. You can then finish by updating or publishing your post.
If you’re creating a link to a different blog post, in the ‘Link’ window, first paste a link to the post you’d like to link to - which must be taken from the frontend and not from within the Gutenberg editor - immediately followed by “#” and the anchor ID, for instance, “spaces.oca.ac.uk/[PostURL]#[AnchorID]”. You can then finish by updating or publishing your post, although for the link to work successfully, both posts will need to be published.
“Link to” is defined at the post, section or heading you’d like or intend to reference.
“Link from” is defined as the text that you’d like users to select prior to navigating to the post, section or heading you’re referencing.
Enlarging Images
Students familiar with WordPress maybe aware of a feature which allows a user, such as your tutor, to select an image where they’ll then be available to view it at its native resolution. While OCA Spaces doesn’t support this feature by default, there is an available workaround only available when using the ‘Gallery’ block.
While a ‘Gallery’ block is intended for use with multiple images, there is no downside to using it to display a single image, as an ‘Image’ block would otherwise do.
Should this be a feature you’d like to enable, you’ll need to repeat the following process on each and all of the ‘Gallery’ block(s) where you’d like the feature to be available.
Having inserted a ‘Gallery’ block and subsequently your image(s), first ensure the block - and not a specific image within the block - is selected, before selecting the ‘Settings’ (Cog) icon. If for any reason you’re unable to select the ‘Gallery’ block specifically, the TEL Team would recommend using the ‘List View’ option to select it; this and the ‘Settings’ icon are both explained in the Gutenberg Editor Interface-chapter.
With the ‘Gallery’ block now selected, next select the ‘Gallery Settings’ dropdown menu and change the ‘Link to’ option from ‘None’ to ‘Media File’.
Following this process will ensure that selecting any of the image(s) within the ‘Gallery’ block can now be selected and viewed at their native resolution.
Create Citations
Unfortunately, due to the discontinuation of the Academic Bloggers Toolkit and the several issues which have since arisen, the TEL Team have made the decision to permanently disable the Academic Bloggers Toolkit plugin, with a view to replacing it in the distant future. In the meantime, students will need to manually create and add their own citations. Any existing citations created using the Academic Bloggers Toolkit should remain unaffected.
WordPress Dashboard
The WordPress Dashboard is the backend administration page for your learning log, and is where you can create and manage content - using the Gutenberg Editor - change or further customise your theme and begin migrating your learning log to another hosting provider, amongst much more.
To access the WordPress Dashboard, follow step 2b as outlined in the Accessing & Linking your Learning Log sub-chapter.
The following sub-chapters - available in the left hand menu - outline some of the functions and processes which are often, although not always, applicable to OCA students, and isn’t a complete list of functions available within the WordPress Dashboard.
WordPress Dashboard Interface
The following interactive WordPress Dashboard Interface activity provides information on the various applicable options available via the WordPress Dashboard. Begin by selecting any of the 'i' icons to find out more information about a specific option.
Jetpack
Jetpack is an all in one toolkit which offers security, performance and site management tools, however and more importantly for OCA students, provides the following benefits;
- Additional block types when using the Gutenberg editor, most specifically;
- Slideshow: A rotating image carousel.
- Tiled Gallery: Display multiple images in a mosaic, grid or column format.
- Access to your OCA Spaces learning log via WordPress.com and the free WordPress mobile app.
- Ability to connect your account to Google Photos and thereby insert images directly, and without the need to manually download and reupload them to OCA Spaces.
Connecting to Jetpack and WordPress.com
Begin by accessing your learning log followed by the WordPress Dashboard. Upon accessing the WordPress Dashboard, next select ‘Jetpack’, located in the left hand menu.
On the following page, next select the blue ‘Set up Jetpack’ option, where you’ll then be prompted to sign in using the ‘Continue with Google’ option; selecting this option whilst signed into your OCA email account will automatically create and sign into your Jetpack account. Having successfully signed into Jetpack and authorised the connection, you’ll next be prompted to select a preferred ‘Plan’, however, can instead select the ‘Start with Free’ option, located towards the bottom of the page.
Having successfully followed this process, you’ll then be redirected back to your learning log on OCA Spaces and with Jetpack enabled, where you can immediately benefit from the aforementioned benefits. However and please note that Jetpack is connected to your learning log on an individual basis, and in the event you've multiple and/or recently created a new learning log, may wish to connect your Jetpack account to each learning log in use.
Connecting to Google Photos
Connecting to Google Photos will allow you to immediately access and insert images into your blog post(s) from Google Photos, and without the need to manually download and reupload them.
Begin by either creating a new or accessing an existing blog post using the Gutenberg editor and insert any image related block, such as an ‘Image’ or ‘Gallery’ block. With an appropriate block inserted, next select ‘Select Image’ followed by ‘Google Photos’. Within the pop-up window, next select ‘Connect to Google Photos’, whereby you’ll be prompted to sign in using your OCA email address.
If done correctly, your Google Photos Library will now be visible, and selecting any image(s) can be inserted into your blog post.
Categories & Menu
“Categories” are defined as the options for which you can categorise your blog post against, such as an ‘Assignment’. Categorising your blog posts helps ensure that those accessing your learning log, and particularly your tutor, are able to quickly find applicable blog posts.
“Menu” is defined as the list of options available to an end user, such as your tutor, and are used to navigate your learning log, such as by listing the categories available.
It should be noted that the categories and your menu are not linked, and any changes made to either often need to be manually replicated to the other.
Categories
To view, create or delete a category(s), first access the WordPress Dashboard, and select ‘Posts’ - located in the left hand menu - followed by ‘Categories’. If the ‘Categories’ option isn’t available, please contact the TEL Team.
Upon selecting the ‘Categories’ option, you’ll find a list of existing categories, which will differ depending on your choice of template, and can be amended accordingly.
Create new category
To create a new category, complete the options available beneath ‘Add New Category’ heading to create.
When creating a new or amending an existing category, the options available are outlined below;
- *Name: The name of the category.
- Slug: The URL extension, for example, spaces.oca.ac.uk/[SiteName]/[Slug]. This can often be left blank and by default will replicate the name.
- Parent Category: Select a parent category if applicable.
- Description: Provide a description of the category, although not essential, and some themes also do not display the description and may therefore be wasteful.
Fields marked with an asterisk (*) are mandatory.
Menu
In the event you’ve made changes to your categories, and more specifically created a new category(s), you’ll need to amend your menu to include them. Actions such as amending or deleting categories are automatically reflected on your menu, providing they’re already available on your menu.
To access and amend your menu, first access the WordPress Dashboard, and select ‘Appearance’ - located in the left hand menu - followed by ‘Menus’. Again, if the ‘Menus’ option isn’t available, please contact the TEL Team.
Ensuring the ‘OCA Primary Nav’ menu is selected, you can then use the ‘Add Menu Items’ heading and specifically the ‘Categories’ dropdown menu to add new categories. Once added, items beneath the ‘Menu Structure’ heading can be rearranged by dragging and dropping them where applicable. A hierarchy can also be created by intending an item to the right.
Once complete, any changes can be saved by selecting the blue ‘Save Menu’ option.
Privacy Settings
Your choice of privacy setting, selected when creating your learning log, will impact who can and cannot access your learning log, although can be continuously updated if necessary.
Outlined below are the various options available;
- ‘Yes’ or ‘Allow search engines to index this site’: Publicly accessible and increases the likelihood of appearing in search engines, such as Google, Bing or Yahoo.
- ‘No’ or ‘Discourage search engines to index this site’: Publicly accessible but aims, although not always, reduces the likelihood of appearing in search engine results.
- Visible only to registered users of this network: Limited to those with an OCA email account and access to OCA Spaces, such as fellow students and staff. The TEL Team recommends this option.
- Visible only to registered users of this site: Limited to those registered as a user your site. Users can be added - thus granting permission - or removed - thus revoking permission. For further information regarding adding or removing a user, please visit the Add or Remove Users sub-chapter.
- Visible only to administrators of this site: As above, but requires the ‘Administrator’ role, and the TEL Team strongly recommends against using this option.
Your learning logs privacy setting should be seen as the primary and overarching privacy setting, and any blog posts published should be made ‘Public’ - the default option when using the Gutenberg editor and cannot be amended using the frontend editor - or will otherwise be inaccessible to everyone, regardless of your learning logs privacy setting. If you'd like to keep a blog post private, the TEL Team would recommend you consider changing your learning logs privacy setting and not the post.
To later amend your learning logs privacy setting, first access the WordPress Dashboard and select ‘Settings’ - located in the left hand menu - followed by ‘Reading’. On the following page and located beneath the ‘Site Visibility’ heading are the various options available and as outlined above. In the event you change this setting, please ensure to select the blue ‘Save Changes’ option before navigating away from the page.
Add or Remove a User(s)
This section is particular applicable to students who've selected the 'Visible to registered users of this site' option and therefore need to add their tutor as a user, thus granting access. This section is also applicable to students' whose tutor is unable to access their learning log.
Having accessed the WordPress Dashboard, select the 'Users' option, located in the left hand menu, where on the following page you'll find a list of users who are able to access your learning log; the only exception being students who've selected the 'Visible only to administrators of this site' option - which the TEL Team strongly recommends against - and the user isn't listed as an 'Administrator'.
Add a User
Having accessed the WordPress Dashboard and selecting the 'Users' option, located in the left hand menu, next select the 'Add New' option. On the following page and within the 'Email or Username' field, enter the user's OCA email address, and ensure the default 'Subscriber' role is selected. Although not essential, the TEL Team also recommends selecting the 'Add the user without sending an email that requires their confirmation' option; selecting this option will immediately add the individual as a user on your learning log, without requiring their confirmation. Finish by selecting the blue 'Add Existing User' option.
Remove a User
Having accessed the WordPress Dashboard and selecting the 'Users' option, located in the left hand menu, use the tick-box, located to the left of a user's name, to select the user(s) you'd like to remove from your learning log, thus revoking access. With the desired user(s) selected, select the 'Bulk Actions' dropdown menu, followed by 'Remove' and 'Apply'.
Assessment
Students including their learning log in their assessment submission first ensure their learning log is accessible to assessors and external examiners.
Students whom have selected the 'Visible to registered users of this network' or earlier do not need to take any further action. Students who've selected 'Visible to registered users of this site' and do not wish to make their learning log accessible to within OCA using the 'Visible to registered users of this network' option should add the 'externalexaminer@oca.ac.uk' account as a user on their site, while also informing the Assessment Team. For information on how to add or remove a user from your learning log, please visit the Add or Remove a User(s) sub-chapter.
Media Library
The Media Library can be accessed via the WordPress Dashboard and selecting ‘Media Library’ from the left hand menu, and contains any and all uploaded media, such as but not limited to images, videos or downloadable files. Deleting an image, video or file from a blog post doesn’t delete it outright, and the Media Library therefore acts as a repository and potential backup.
Deleting an image, video or downloadable file from the Media Library will delete it outright, thus making it inaccessible from any and all blog post(s) in which its used or referenced, but will not remove the individual reference(s) within your blog post(s).
Accessing an image via the Media Library also allows for minor edits, such as cropping or rotating. To edit an image, first select the appropriate image followed by the ‘Edit Image’ option. Please note that any changes made to an image via the Media Library will apply to all instance(s) where the same uploaded image has been included in your post using the 'Media Library' option when inserting the image into your blog post(s). The TEL Team would therefore recommend uploading the image twice in the event you want to use the image twice, editing only one of the two instances.
When publishing a new blog post, the TEL Team would strongly recommend ensuring to use the 'Posts' option, available via the WordPress Dashboard, or alternatively, using the Frontend Editor; please refer to the Creating & Editing a Blog Post sub-chapter for applicable guidance. The 'Pages' option, however, can be used to create custom pages within your learning log, such as a custom homepage, for example, whereby your posts can be;
- Displayed in chronological order (oldest to newest) or reverse chronological order (default, newest to oldest);
- Displayed in an alternative format or style, such as including an excerpt, dated published, list or grid format and with or without a featured image;
- Include or exclude blog post(s) based on their assigned category(s);
- Include additional contents besides a list of applicable blog posts, such as social media links and/or embeds, a brief introduction or about section, series of image(s) etc.
The above are a series of examples which maybe applicable to some OCA students and isn't a definitive list of capabilities or options. Additionally, the following guidance is purely for aesthetic purposes and isn't a requirement of OCA students; providing your blog posts are categorised correctly, the default reverse chronological order in which your blog posts appear is sufficient.
Custom Homepage
Creating a Custom Homepage
While the following guidance is primarily aimed at those looking to create a custom homepage, the following guidance can also be used to create any number of custom pages within OCA Spaces. For example, the guidance could also be used to create a custom page(s) for each of your category(s), however and in such circumstances, each page(s) will need to be manually added to your menu; please refer to the Categories & Menu sub-chapter, and specifically the Menu heading, for applicable guidance on this process.
To begin, first access the WordPress Dashboard and select the 'Pages' option - located in the left hand menu - followed by 'Add New'.
On the following page, next add a preferred page title, such as "Home" or "Homepage", and insert a 'Latest Posts' block; this page functions using the Gutenberg Editor, and students can therefore refer to the Gutenberg Editor sub-chapter for guidance regards to Adding a New Block. With the 'Latest Posts' block selected, next select the 'Settings' (Cog icon) - located in the upper right corner - to access and amend the block settings as desired. Within this menu, the available settings can be used to;
- Display an excerpt and specific number of characters, or the entire post contents;
- Display the author's name and/or date published;
- Display and amend the size of the featured image, if applicable;
- Adjust the order in which blog posts are listed;
- Include or exclude a category(s);
- Increase or decrease the number of posts visible.
With the 'Latest Posts' block selected and using the Top Toolbar - as outlined in the Gutenberg Editor Interface - you can also change the format in which your blog posts are listed, selecting either a list or grid format.
At this stage and using any of the available block types, you can add any additional contents, such as an introduction or about section, social media links and/or embeds, images etc.
With your homepage now complete, select the blue 'Publish' option, located in the upper right corner, before navigating back to the WordPress Dashboard.
Setting a Custom Homepage
From the WordPress Dashboard, select 'Appearance' - located in the left hand menu - followed by 'Customise'. On the following page, then select 'Homepage Settings' and the 'Static Page' option. Beneath the 'Homepage' heading and using the dropdown menu, select the page created earlier and confirm the change by selecting the blue 'Publish' option - located in the upper left corner.
If done correctly and upon accessing your learning log, your custom homepage should now be accessible and display the contents as expected.
Exporting & Importing
This sub-chapter is particularly applicable to students who’ve completed a course unit and/or their degree and are looking to retain their work, or students who’ve used an alternate hosting provider, such as WordPress.com, and are looking to migrate their work to OCA Spaces. The Export process is also applicable to those looking to keep a local (on device) backup of their work, although OCA Spaces is backed up daily and students therefore do not need to manually backup their work.
Additionally and by following this process, you’re essentially creating a copy or duplicate of your existing learning log, and once duplicated the two versions are not connected, and any changes made to one will not be reflected on the other. The original site, whether this be available on OCA Spaces and/or WordPress.com, for instance, will also remain and be unaffected. The TEL Team therefore recommends students migrate their learning log only after completing a unit and/or their degree.
Export
The Export process involves taking a copy of an existing site, available on OCA Spaces for instance, before subsequently importing elsewhere, such as on WordPress.com or vice versa, following the Import process.
To export your site, first access the WordPress Dashboard and select ‘Tools’ - located in the left hand menu - followed by ‘Export’. On the following page and ensuring the ‘All Content’ option is selected, select the blue ‘Download Export File’ option. Selecting this option will prompt you to download either a single .XML file, or a ZIP folder; the latter of which you'll need to unzip, before continuing to follow the Import process, and contains multiple .XML files. The number of ZIP files downloaded will be determined by the amount of content, both blog posts and media, available on your site.
For information on extracting a ZIP folder, please refer to the following appropriate; Unzipping a ZIP folder on Mac or Extracting a ZIP folder on Windows.
Import
The Import process involves takes the .XML file(s), downloaded following the Export process, and importing them onto another site, thus completing the migration.
Having first followed the Export process and with the .XML file(s) downloaded, and if necessary, unzipped, first create a new site, either on OCA Spaces - for those migrating to OCA Spaces - or another hosting provider, such as WordPress.com - for those migrating away from OCA Spaces.
Upon creating a new site, again access the WordPress Dashboard and select ‘Tools’ followed by ‘Import’, where you’ll be prompted to upload the .XML file(s). In the event you’ve several .XML files available, you’ll need to repeat this process - minus creating a new site - for each .XML file available.
Upon uploading a single .XML file, it may take several minutes or hours to complete the migration, and in the event you've a single .XML available, completing the Import process will complete the migration process, while in the event you've multiple .XML files available, completing the migration process for a single .XML file will likely only migrate a portion of your learning log.
Frequently Asked Questions
This chapter contains answers to the following questions;
- How do I recover a deleted blog post?
- Can I retain my work from OCA Spaces upon completing a unit and/or degree?
- Accessing a specific category, some blog posts aren't visible, even after selecting the 'Load More' option?
- Can I apply a Featured Image that isn't visible when accessing a specific blog post?
- How do I upload a file(s) to OCA Spaces?
- Can I create a custom page or homepage?
How do I recover a deleted blog post?
Students who've deleted a blog post using either the Gutenberg or Frontend editor can recover their blog post via the WordPress Dashboard and selecting 'Posts' followed by the 'Bin' option. All other blog posts, including those which are 'Private' - although recommended not to be used - or in 'Draft' status can be found on this page.
In the event your post isn't available on this page and/or via the 'Bin' option, your post has likely been permanently deleted; you may wish to contact the TEL Team who'll be able to confirm whether or not this is the case, but will be unable to recover the post.
Can I retain my work from OCA Spaces upon completing a unit and/or degree?
Yes! Any and all learning logs available on OCA Spaces can be migrated to an external hosting provider, such as WordPress.com, following the Importing & Exporting process.
Accessing a specific category, some blog posts aren't visible, even after selecting the 'Load More' option?
In such instance, the TEL Team would recommend increasing the number of posts initially visible and prior to selecting the 'Load More' option.
You can do this by accessing the WordPress Dashboard and selecting 'Settings' followed by 'Reading', and increasing the 'Blog pages shown at most' option to exceed the maximum number of blog posts per category. For example, if your most used category has 13 blog posts, the TEL Team would recommend increasing this option to 15, thus accounting for existing and any potential future blog posts assigned to this category.
Finish by selecting the blue 'Save Changes' option, located at the bottom of the page, and confirm whether or not all of the appropriate blog posts are now visible.
Can I apply a Featured Image that isn't visible when accessing a specific blog post?
Yes, although this does require the use of CSS, and the change will apply across your entire learning log and not to one specific blog post. Additionally, the featured image visible prior to accessing a specific blog post, from your homepage or a specific category for instance, will remain intact. For more information regarding featured images, please refer to the Featured Image definition.
The following interactive Featured Image Comparison activity demonstrates the intended difference and outcome of this particular process.
To apply this change to your learning log, begin by accessing the WordPress Dashboard and select 'Appearance' followed by 'Additional CSS'. Within the text entry pane, located on the left, copy and paste the entirety of the following code; ".featured-media img {display: none}", followed by selecting the blue 'Publish' option.
Accessing your learning log and visiting the homepage and/or any specific category, the featured image will remain visible, however, selecting a specific blog post, the featured image will no longer be visible at the top and prior to the contents of your blog post.
How do I upload a file(s) to OCA Spaces?
To upload a file(s) to OCA Spaces which is later available for users, such as your tutor, to download students must first use the Gutenberg Editor; unfortunately, file(s) cannot be uploaded using the Frontend Editor. Using the Gutenberg Editor and having accessed either an existing blog post or having created a new one, next insert a 'File' block, where you'll then be prompted to upload your file.
Repeat this process for each file that you'd like to upload.
While there is no restriction on the file types that can be uploaded, students should be mindful of the programme required to open the file. For example, an Apple Pages document will require users to have an Apple device and use the Pages software, and the file should therefore be ideally converted to a PDF beforehand. Additionally, students are restricted to the 64MB file upload limit, and in instances where the file exceeds this limit, may wish to instead copy the contents directly into the blog post or look to reduce the file size.
Can I create a custom page or homepage?
Yes, and a custom homepage, for example, can also be used to;
- Display blog posts in chronological order (oldest to newest) or reverse chronological order (default, newest to oldest);
- Display blog posts in an alternative format or style, such as including an excerpt, dated published, list or grid format and with or without a featured image;
- Include or exclude blog post(s) based on their assigned category(s);
- Include additional contents besides a list of applicable blog posts, such as social media links and/or embeds, a brief introduction or about section, series of image(s) etc.
The above is not a definitive list of capabilities and for more information and/or applicable guidance, please refer to the Custom Pages sub-chapter.