OCA Learn Support & Guidance
| Site: | OCA Learn |
| Course: | Tech Support, Guidance & Workshops |
| Book: | OCA Learn Support & Guidance |
| Printed by: | Guest user |
| Date: | Thursday, 16 July 2026, 8:35 AM |
Description
This activity contains support and guidance regarding the use of OCA Learn, including how to access and sign in, finding resources and submitting assignments.
Getting Started
Use the chapters available on the left to navigate to a specific topic, or read through the entire activity for a broader view of OCA Learn.
All information and guidance available throughout this activity is accurate and correct of August 31st 2022.
Once complete, continue through the remaining support and guidance sections before providing feedback, requesting additional guidance or reporting any mistakes using the Tech Support, Guidance & Workshops Feedback activity.
Signing In
Prior to accessing and signing into OCA Learn, you’ll first need to sign into your OCA email account; please visit the Google Support & Guidance section for more information on this process.
Upon signing into your OCA Email account, you can access and sign into OCA Learn using the ‘Sign in with your OCA Email through Google’ option, as highlighted in the screenshot below.

Selecting this option whilst signed into your OCA Email account will sign you in automatically. In the event you’re signed into multiple Google accounts and aren’t using separate Google Chrome Profiles - as suggested in the Google Support & Guidance section - you’ll need to select your OCA account from a list of signed in users. Providing you’re signed into your OCA email account, at no stage do you need to manually enter your login details when signing into OCA Learn.
Interface & Navigation
Interface
The following interactive OCA Learn Interface activity demonstrates the 'My Courses' page and provides information on the various applicable options available. Begin by selecting any of the 'i' icons to find out more information about a specific option.
Navigation
My Courses
The 'My Courses' option is available from any course, section or activity on OCA Learn and is located in the upper right corner. The 'My Courses' page functions similar to an overlay, and selecting the option won't immediately navigate from your current page without first selecting another course or option, instead can be closed, thus returning to your original page by selecting the 'Close' option, also located in the upper right corner.
Breadcrumb Trail
The breadcrumb trail located in the upper left corner from any course, section or activity, you'll find the breadcrumb trail, which can be used to identify the path taken to access a particular page, section or activity, as demonstrated in the screenshot below, and follows the following format; Home / Courses / Programme / Course Code / Section / Activity.

Selecting any of these options will take you to the respective course, section or activity, and can be further used to identify the path or route to find and access an activity or resource.
Alternative file format conversions in your courses
OCA Learn provides alternative versions of its course materials for students and tutors to download. This service is provided through the 'Brickfield Toolkit alternative file format conversion tool’ and gives staff and students the ability to easily generate and download multiple alternate file formats of the existing educational resources within their course.
The toolkit provides several conversion options, depending on the type of original file or resource being converted, whether it is a word document, a PDF, a Book resource, a spreadsheet and so on.
The Brickfield Toolkit alternative file format conversion tool is available within your course units and other spaces on OCA Learn through the conversion icon illustrated below (three arrows in a circular formation).
Requesting an alternative file format
When you use the Request conversion icon, a popup screen appears, where you can select the available alternative format options for converting the file.
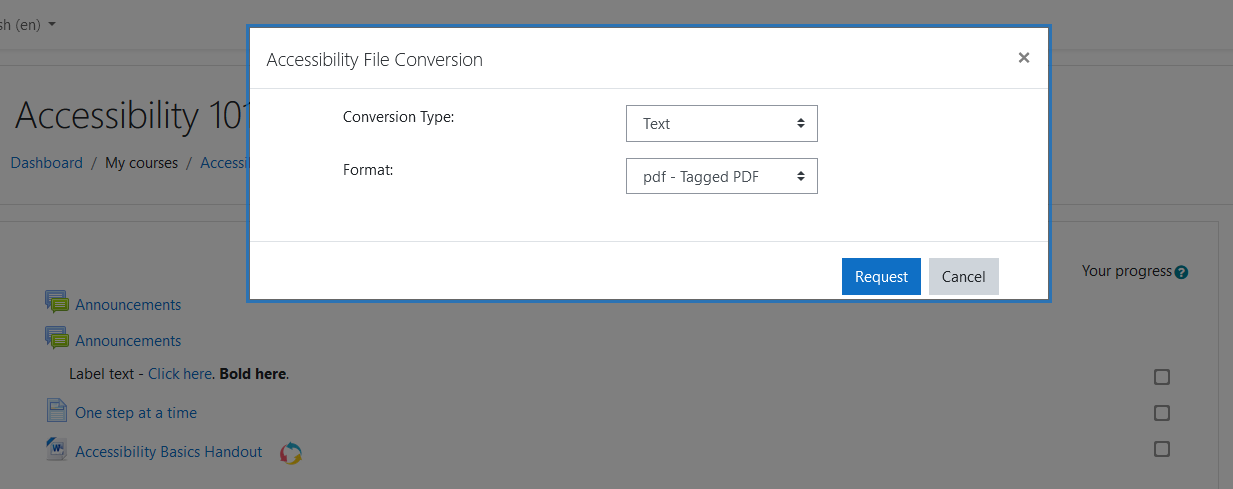
Different conversion types
The “Conversion Type” dropdown shows the initial available options for the file being converted, so in this example case for a Word document, they are as follows:
Text
Audio
Ebook
DAISY
Braille
These main conversion types are then split into formats, depending again on the file being converted, so in this example case for a Word document for a Text type, they are as follows:
PDF – Tagged PDF
TXT – Plain text
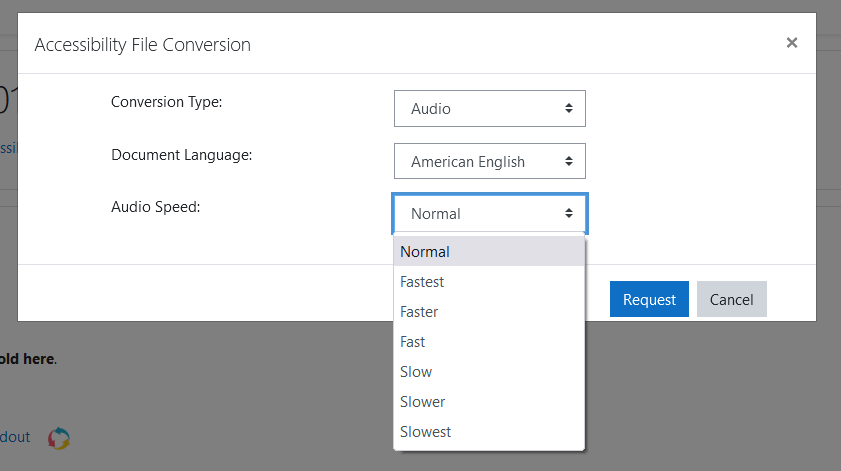
Each different conversion type has a different range of formats on offer. For instance, if you select the Audio type, you then can select the language that the original document has been composed in, and the speed that you want the audio to be converted to, according to your preference.
Once you have selected both the conversion type and format options, you should click on the “Request” button to proceed with the conversion, or click on the “Cancel” button to cancel the request and return to the course main page.
When you click on the “Request” button, the toolkit checks if this particular type and format conversion has been previously requested and processed for this file resource.
If the specific conversion type has already been processed, the alternative file will already be stored, and will be instantly produced as a file that can be downloaded. If you are a member of academic or head office staff, and you know in advance that a particular student will need audio conversions (and which speed format they prefer), you can request those conversions to get them processed in advance, so that they will then be ready for instant downloading whenever the student needs them.
If the file has not already been converted to the specified conversion type and format, the alternative file will be requested, and the student will see a confirmation message displayed. This means that their conversion request has been queued and they can safely return to the course main page. To exit out of the popup screen, they can either click on the “Close” button, or on the “X” icon in the top right corner of the popup, or else click anywhere on the screen outside the popup screen.

Retrieving a newly processed alternative file format
The file conversion can take between a few minutes and an hour usually, depending on the size and type of the file content being converted.
Once the alternative format file process is completed, you will see a new notification alert confirming the status of the file conversion.

When you click on this notification popup, you can then click on the "(Filename) is ready for download" link to bring up the new file to open or download. You can also click on the relevant "View full notification" link to view all the notification messages.
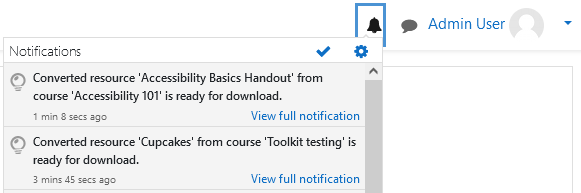
In the notifications page, you will see the full notification message, which contains the message details such as “Your document conversion request for "Accessibility Basics Handout original.mp3 Audio' is now ready for download." You can also click on this link to open or download the new file.

You will now have access to the converted file, in the conversion type and format requested! You can either open it directly or save it to a device to interact with it later.
Self Service Accessibility File Conversion
Available within OCA Learn, students can request any text based document, webpage or self written text be converted into an alternate and accessible file format, which is subsequently delivered to your OCA email address.
To begin, access the Self Service Accessibility File Conversion page and either upload your file, paste a link to the relevant webpage or manually enter text. Next select your preferred format, either audio, braille or ebook followed by any specific format options. Once complete, next enter your OCA email address and select the ‘Submit’ option. Once processed, your requested file will be delivered via email.
Read Aloud
Available from within any page, course or activity, users can request text available within OCA Learn to be read aloud and at varying playback speeds.
To begin, highlight the desired text up to 500 words. With the desired text highlighted, next select the ‘Text to Speech’ option (Speech Bubble icon) - located in the bottom left - followed by ‘Process Audio’.
Once processed and usually within a matter of seconds, you can then start the playback by selecting the ‘Play’ option, and if necessary, adjust the playback speed by selecting the ‘Kebab’ menu (Three Dots), followed by ‘Playback Speed’ and selecting a preferred option.
Users can repeat this process as many times as necessary, however, cannot navigate away from the page otherwise the audio playback will be stopped.
Activity Completion
Please note that the course completion or progress displayed for a course on OCA Learn isn't monitored or mandated during your course and is not a requirement for having a course unit marked as ‘Complete’. This sub-chapter is only applicable to students who would like their course to be displayed as complete on OCA Learn.
The 'Complete' course unit status required for any OCA course unit to be marked as complete in order to remain within unit and programme timeframes, and to carry out formal assessment, refers to OCA's official student records and isn't in reference to the course completion displayed on OCA Learn.
Activity completion is applied per each activity, and is used to calculate and display the progress made within a particular course. The activity completion may differ per each activity and will use one of the following three settings;
Not Applicable
The activity doesn't have any activity completion settings applied and therefore doesn’t contribute towards the completion or progress percentage of the course. The ‘Not applicable’ setting can be identified by the lack of a ‘Tick’ or ‘Explanation Mark’ icon, as further explained in the following two settings.

Automatic
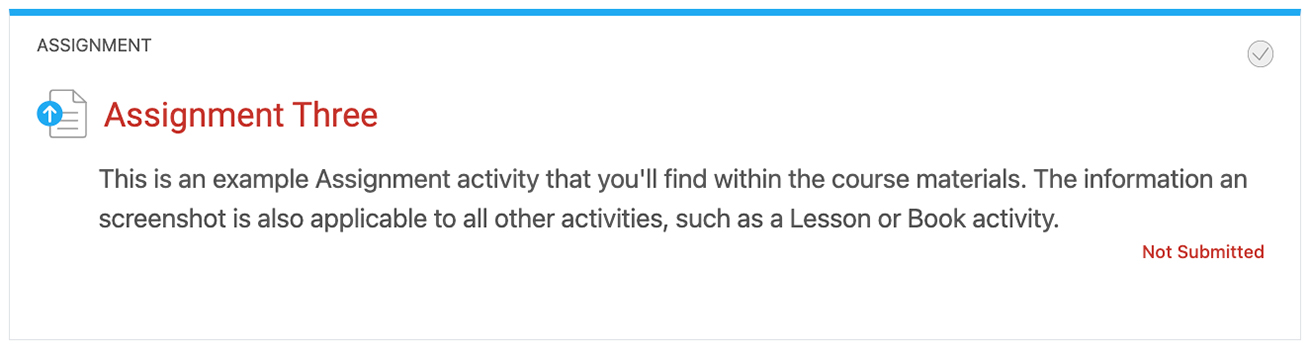
Automatic activity completion will automatically mark the activity as complete once the activity criteria has been satisfied. Satisfying the criteria typically requires reading through the activity and any chapters or sub-chapters and/or uploading and submitting work. Automatic activity completion can be identified by the ‘Explanation Mark’ icon, located in the upper right corner of the respective activity.

In the instance automatic completion is applied, you can also access the activity and view the completion criteria, available in the upper left corner, and as demonstrated in the screenshot below.

Manual
Manual activity completion can be identified by the grey ‘Tick’ icon, located in the upper right of the respective activity, and the activity can be manually marked as complete by selecting the same grey 'Tick' icon.
Identifying Outstanding Activities
Any outstanding activities can quickly be identified by viewing the sections menu - located on the left and as demonstrated in the screenshot below - before visiting sections which aren't complete and locating any activities which aren't completed. Activities which are complete will be marked by a green equivalent of the 'Tick' or 'Explanation Mark' icon, as explained above and demonstrated in the screenshot below.

Finding Resources
Course specific resources are available within the respective course and accessing the ‘Resources’ section. Degree or non course specific resources can also be found within the respective Department and selecting the ‘Resources’ section.
Depending on which and the nature of the resource, you may need to check both instances in order to find the appropriate resource. Once found, you may wish to add a link to the resource in your Personal Tech Support & Guidance Notepad (Padlet), which can be found and later accessed via Padlet, the Padlet app or the Introduction section of the Tech Support, Guidance & Workshops course.
Finding Fellow Students
To find fellow students within OCA Learn, first navigate to either a specific unit or degree programme department; accessing a specific course unit will list students who are actively studying the same unit, while accessing the degree programme will list students studying the same degree pathway - although not necessarily the same unit with the exception of those on Post Period Review (PPR) courses.
Having accessed either a specific unit or department, located beneath on the left and beneath the various part or project sections, you'll need to select the 'Course Dashboard' option. Upon selecting this option and on the following page, you can then select 'Participants', where you'll be able to view fellow students.
Text Editor
This chapter is applicable to those using the text editor available within OCA Learn, such as when creating a forum post or using the online text[box] when submitting an assignment.
This chapter is broken down into three headings;
Interface: An interactive activity which demonstrates the various tools and options available within the editor.
Good Practice & Tips: General good practice and advice including;
Forums: Support and guidance only applicable when using a forum activity.
Interface
The following interactive OCA Learn Text Editor activity provides information on the various applicable options available when using the text editor available within OCA Learn. Begin by selecting any of the 'i' icons to find out more information about a specific option.
Good Practice & Tips
Copying & Pasting Text
Text copied from an external source, such as a Microsoft Word or Google Document, does not retain the following and will therefore need to be manually reapplied once pasted into the editor;
- Bold or Italic formatting
- Paragraph or Heading styles
- Hyperlinks
Upon pasting text from an external source, you may also wish to use the ‘Clear Formatting’ option - as explained in the Interface subheading - to remove any additional formatting caused by the process of copying and pasting text.
The TEL Team also recommends against copying and pasting images, instead ensuring to follow the Inserting Images guidance, and applying any formatting, such as bold or italic text, only once all the contents have been pasted and are in position.
Creating Hyperlinks
A hyperlink is selectable or clickable text that redirects the user to another page or site, for example, Google or Google.com. By default, links added within OCA Learn do not automatically hyperlink and will therefore need to be manually created; this is different to Microsoft Word, for instance, where adding the “google.com” text will automatically create a hyperlink.
Additionally, a hyperlink can be added to all text and isn’t limited solely to links and/or URLs. For example, a hyperlink can be created using both “Google” and “Google.com”.
With the desired text selected, next select the ‘Link’ option - as explained in the Interface subheading - and add the appropriate URL within the ‘Create Link’ window. The TEL Team would also recommend selecting the ‘Open in new window’ option, before selecting the ‘Create Link’ option.
Inserting Images
To insert an image, first select the ‘Show/Hide Advanced Options’ option - as explained in the Interface subheading - followed by the ‘Insert/Edit Image’ option. Next select the red ‘Browse Repositories…’ option, and ensure the ‘Upload a File’ heading is selected, followed by selecting ‘Choose File’, where you’ll then be prompted to upload your desired image.
Upon selecting your image, next select the red ‘Upload this File’ option, where you’ll then be prompted to include an alt tag and be able to resize your image if necessary. An “alt tag” or “description” is used by those who may be visually impaired and should be used to describe your image. Additionally and by default, the width of your image will be constrained by OCA Learn, and in the event you do need to resize your image, the TEL Team would recommend ensuring the ‘Auto Size’ option is enabled. While there is no recommended or maximum width for your image, the TEL Team would however recommend ensuring your image is no larger than 1000px in height.
Once complete, you can then select the red ‘Save Image’ option, whereby your image will be inserted based on the position of your caret (flashing cursor icon).
To insert another image, deselecting your existing image, either by selecting the existing image followed by the left or right arrow key on your keyboard, or by selecting any of the surrounding area within the textbox, before following the above process once again.
To edit an existing image, such as to replace or resize the image, first select the appropriate image followed by the 'Add/Edit Image' option, as explained in the Interface subheading.
Forums
To access the additional formatting options outlined in the Interface subheading; upon selecting the ‘Add a new discussion’ or ‘Reply’ option, next select the ‘Use advanced editor and additional options’ option, located in the lower right corner and beneath the initial text editor.
Additionally, when posting to a forum, students have a five minute window upon publishing their post in which to edit it, and will be unable to edit their post thereafter. Should you need to edit your post after the five minute window has expired, please contact the TEL Team.
Uploading to a Media Collection
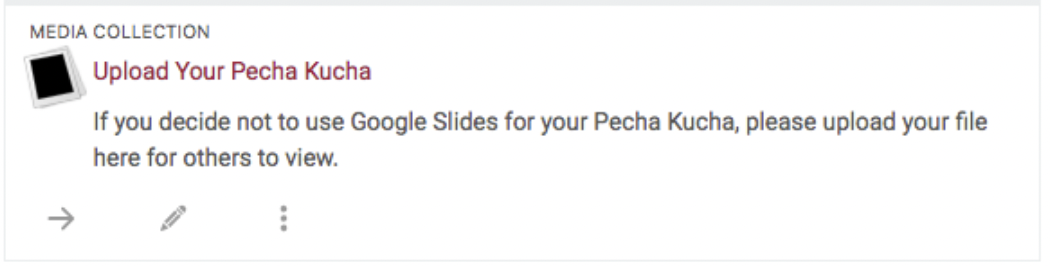
As part of your studies, you may be asked to create a gallery, or add to an existing one. The following guidance will help you in creation of a new gallery. These may be presentations you have made, images or other types of content that your tutor and/or peers will need access to. When you are expected to upload something to the VLE you may see a component called a 'Media collection'. A Media Collection is a place that holds uploads from students.
Start by clicking on the the Media Collection:
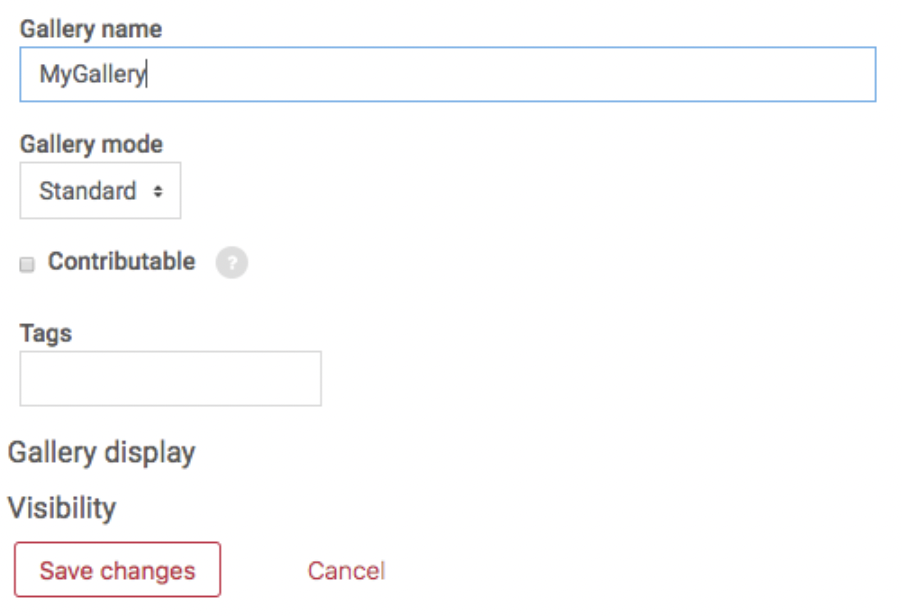
Next, select the "+ Add a Gallery" option.
This will give you the option to title your gallery. It is sensible to title it with your name, unless your tutor has requested something else. Click ‘Save Changes’
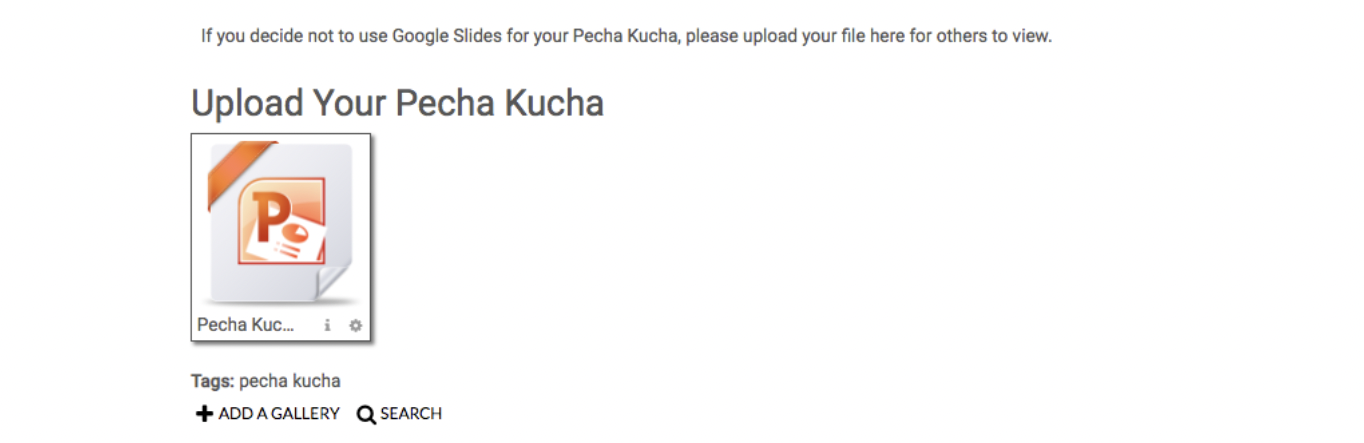
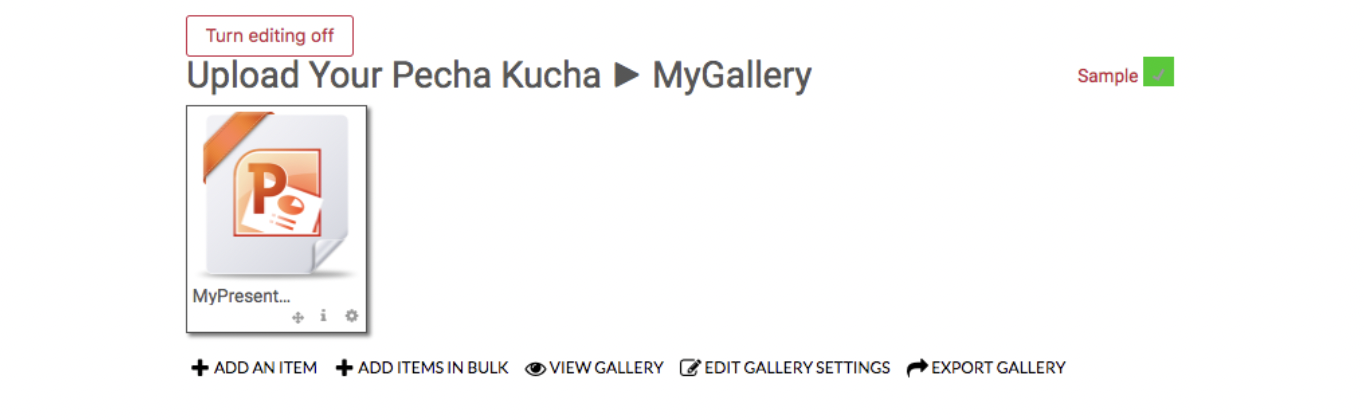
The gallery is now created, however it is empty. The next step is to add your files to it, select the '+ Add an item' option.

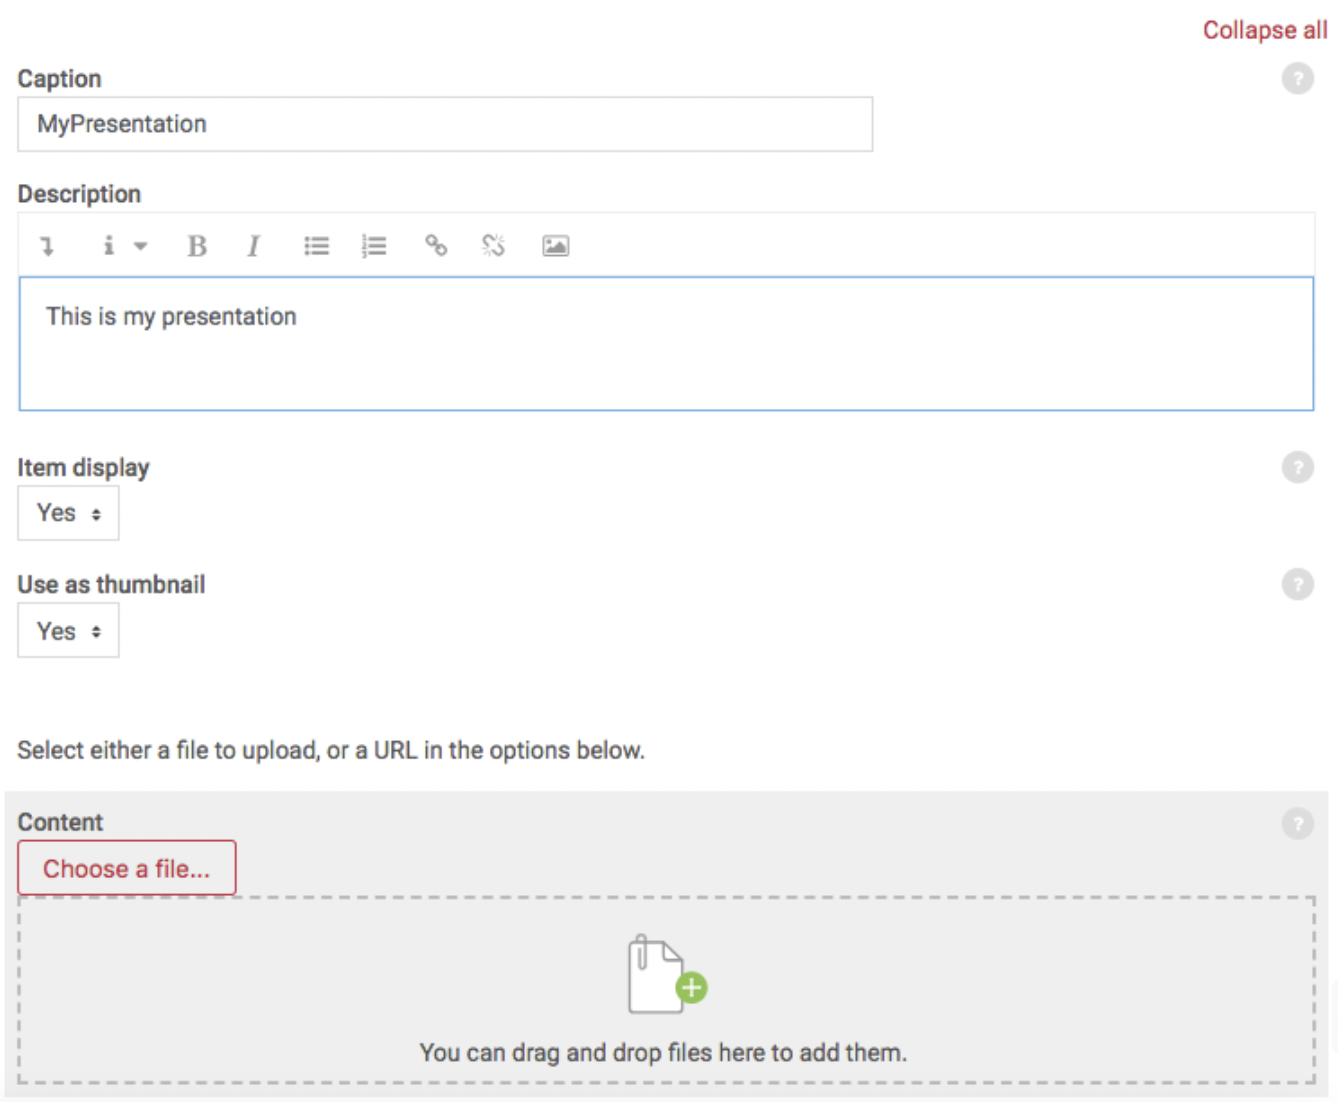
Again, you will be given the option to title the file and add a description. Please ensure this is something the tutor will recognise as yours. Now click the "choose a file" button to upload the file as an item and click "Save changes" at the bottom (no other options need to be changed or selected).
Once this is completed you will be shown your gallery.
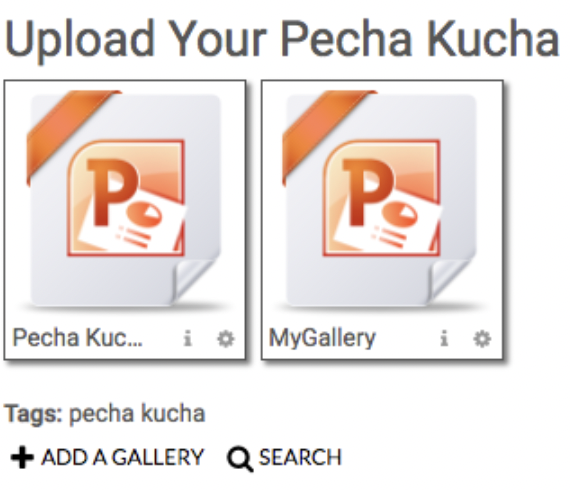
Going back to the 'Media collection' you should be able to see your gallery alongside other submissions and examples. This is where the tutor and/or other students will download it from, as everyone on the VLE will now have access.
If you need to make further edits to a gallery, you will need to use the 'Turn Editing On' button first.
The benefit of having shared Media Collections is so that students and tutors can compare, study and discuss each others work easily and openly.
Submitting Assignments
This chapter contains both written and visual guidance, and a video demonstration.
Written & Visual Guidance
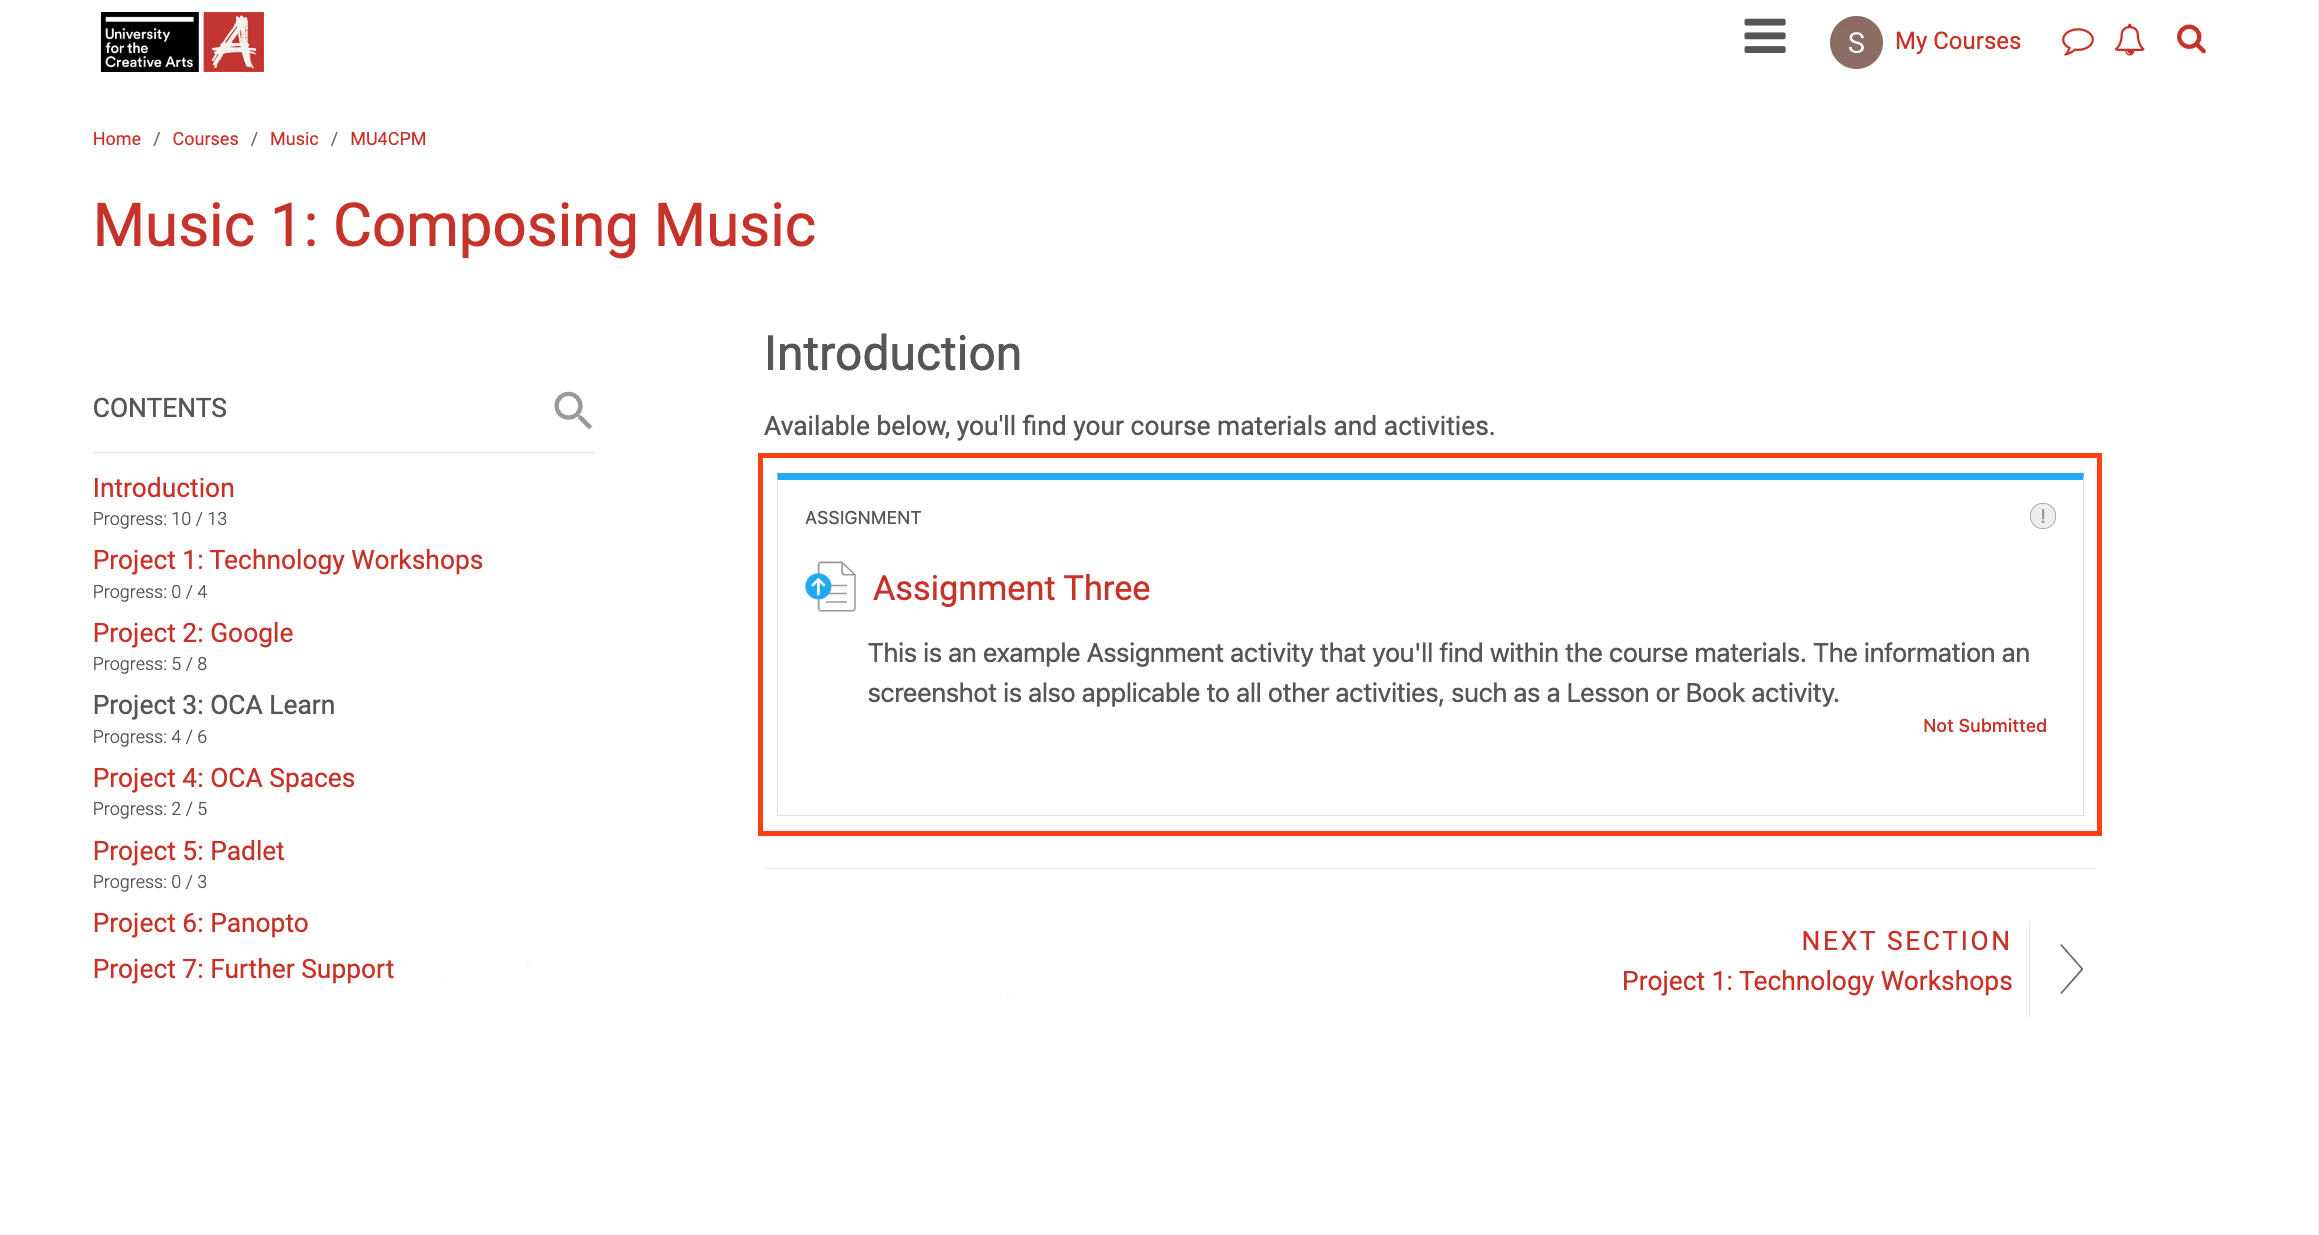
To submit an assignment via OCA Learn first select the ‘My Courses’ option, located in the upper right corner, followed by the respective course.
Upon accessing the appropriate course and using the menu located on the left, select the appropriate part or project; in most instances, the assignment activity can be found in the corresponding part or project. For example, Assignment 3 is typically located in Part or Project 3.
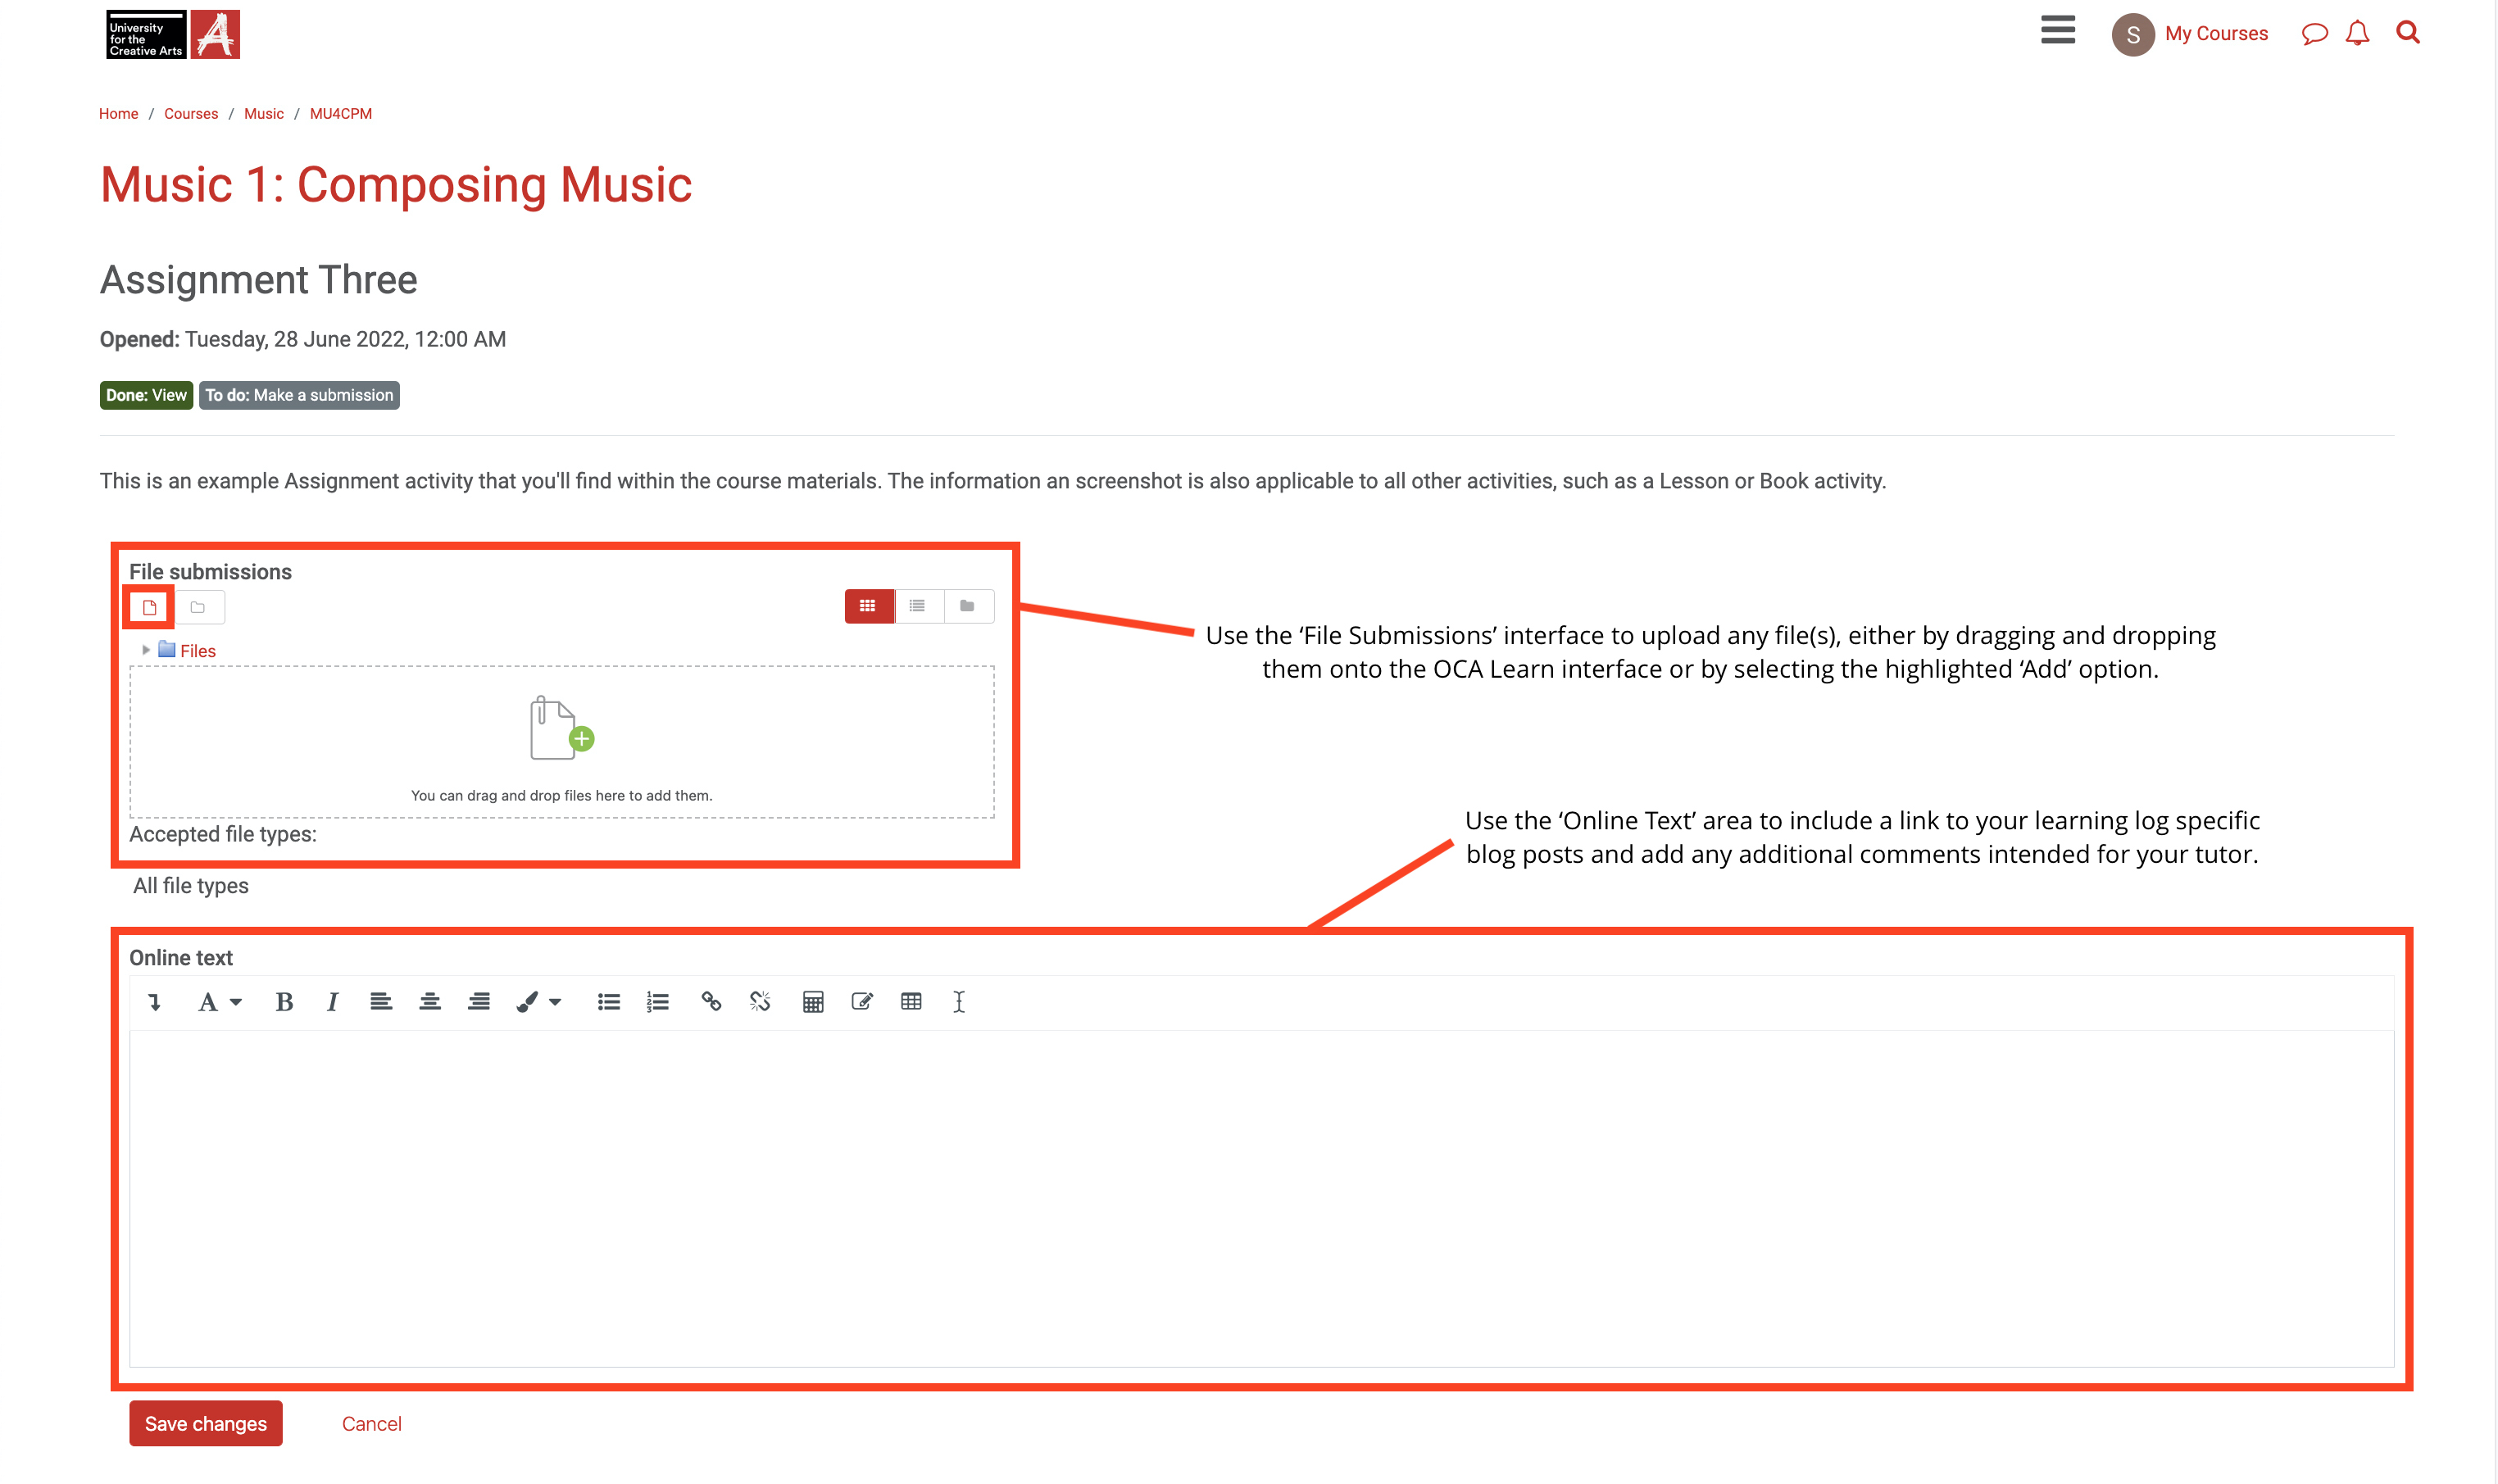
Next locate the appropriate assignment activity, most often located at the end of the course contents or towards the bottom of the respective section. Once located, then select the assignment activity, whereby you’ll then be able to read the assignment brief and select the ‘Add Submission’ option.
On the following page, you can then upload any file(s) beneath the ‘File Submissions’ heading, either by dragging and dropping the files onto the OCA Learn interface or by selecting the ‘Add’ option. In addition or alternatively and depending on the assignment brief, you can also add a link to your learning log or specific blog post(s), and further include any further comments or information in the textbox, located beneath the ‘Online Text’ heading.
For information on how to link your learning log or specific blog post(s), please visit the Accessing & Linking your Learning Log sub-chapter. Additionally, for information on how to create a clickable or selectable hyperlink to your learning log or respective blog posts within your assignment submission, please visit the Creating Hyperlinks sub-chapter.
With your submission uploaded and consisting of uploaded file(s) and/or a link to your learning log or specific blog post(s), you can then select the ‘Save Changes’ option, located in the lower left.
On the following page, you'll then need to confirm your submission by selecting the ‘Submit Assignment’ option; failure to follow this final step will result in your assignment being left in draft status, whereby your tutor will not receive notification of your submission.
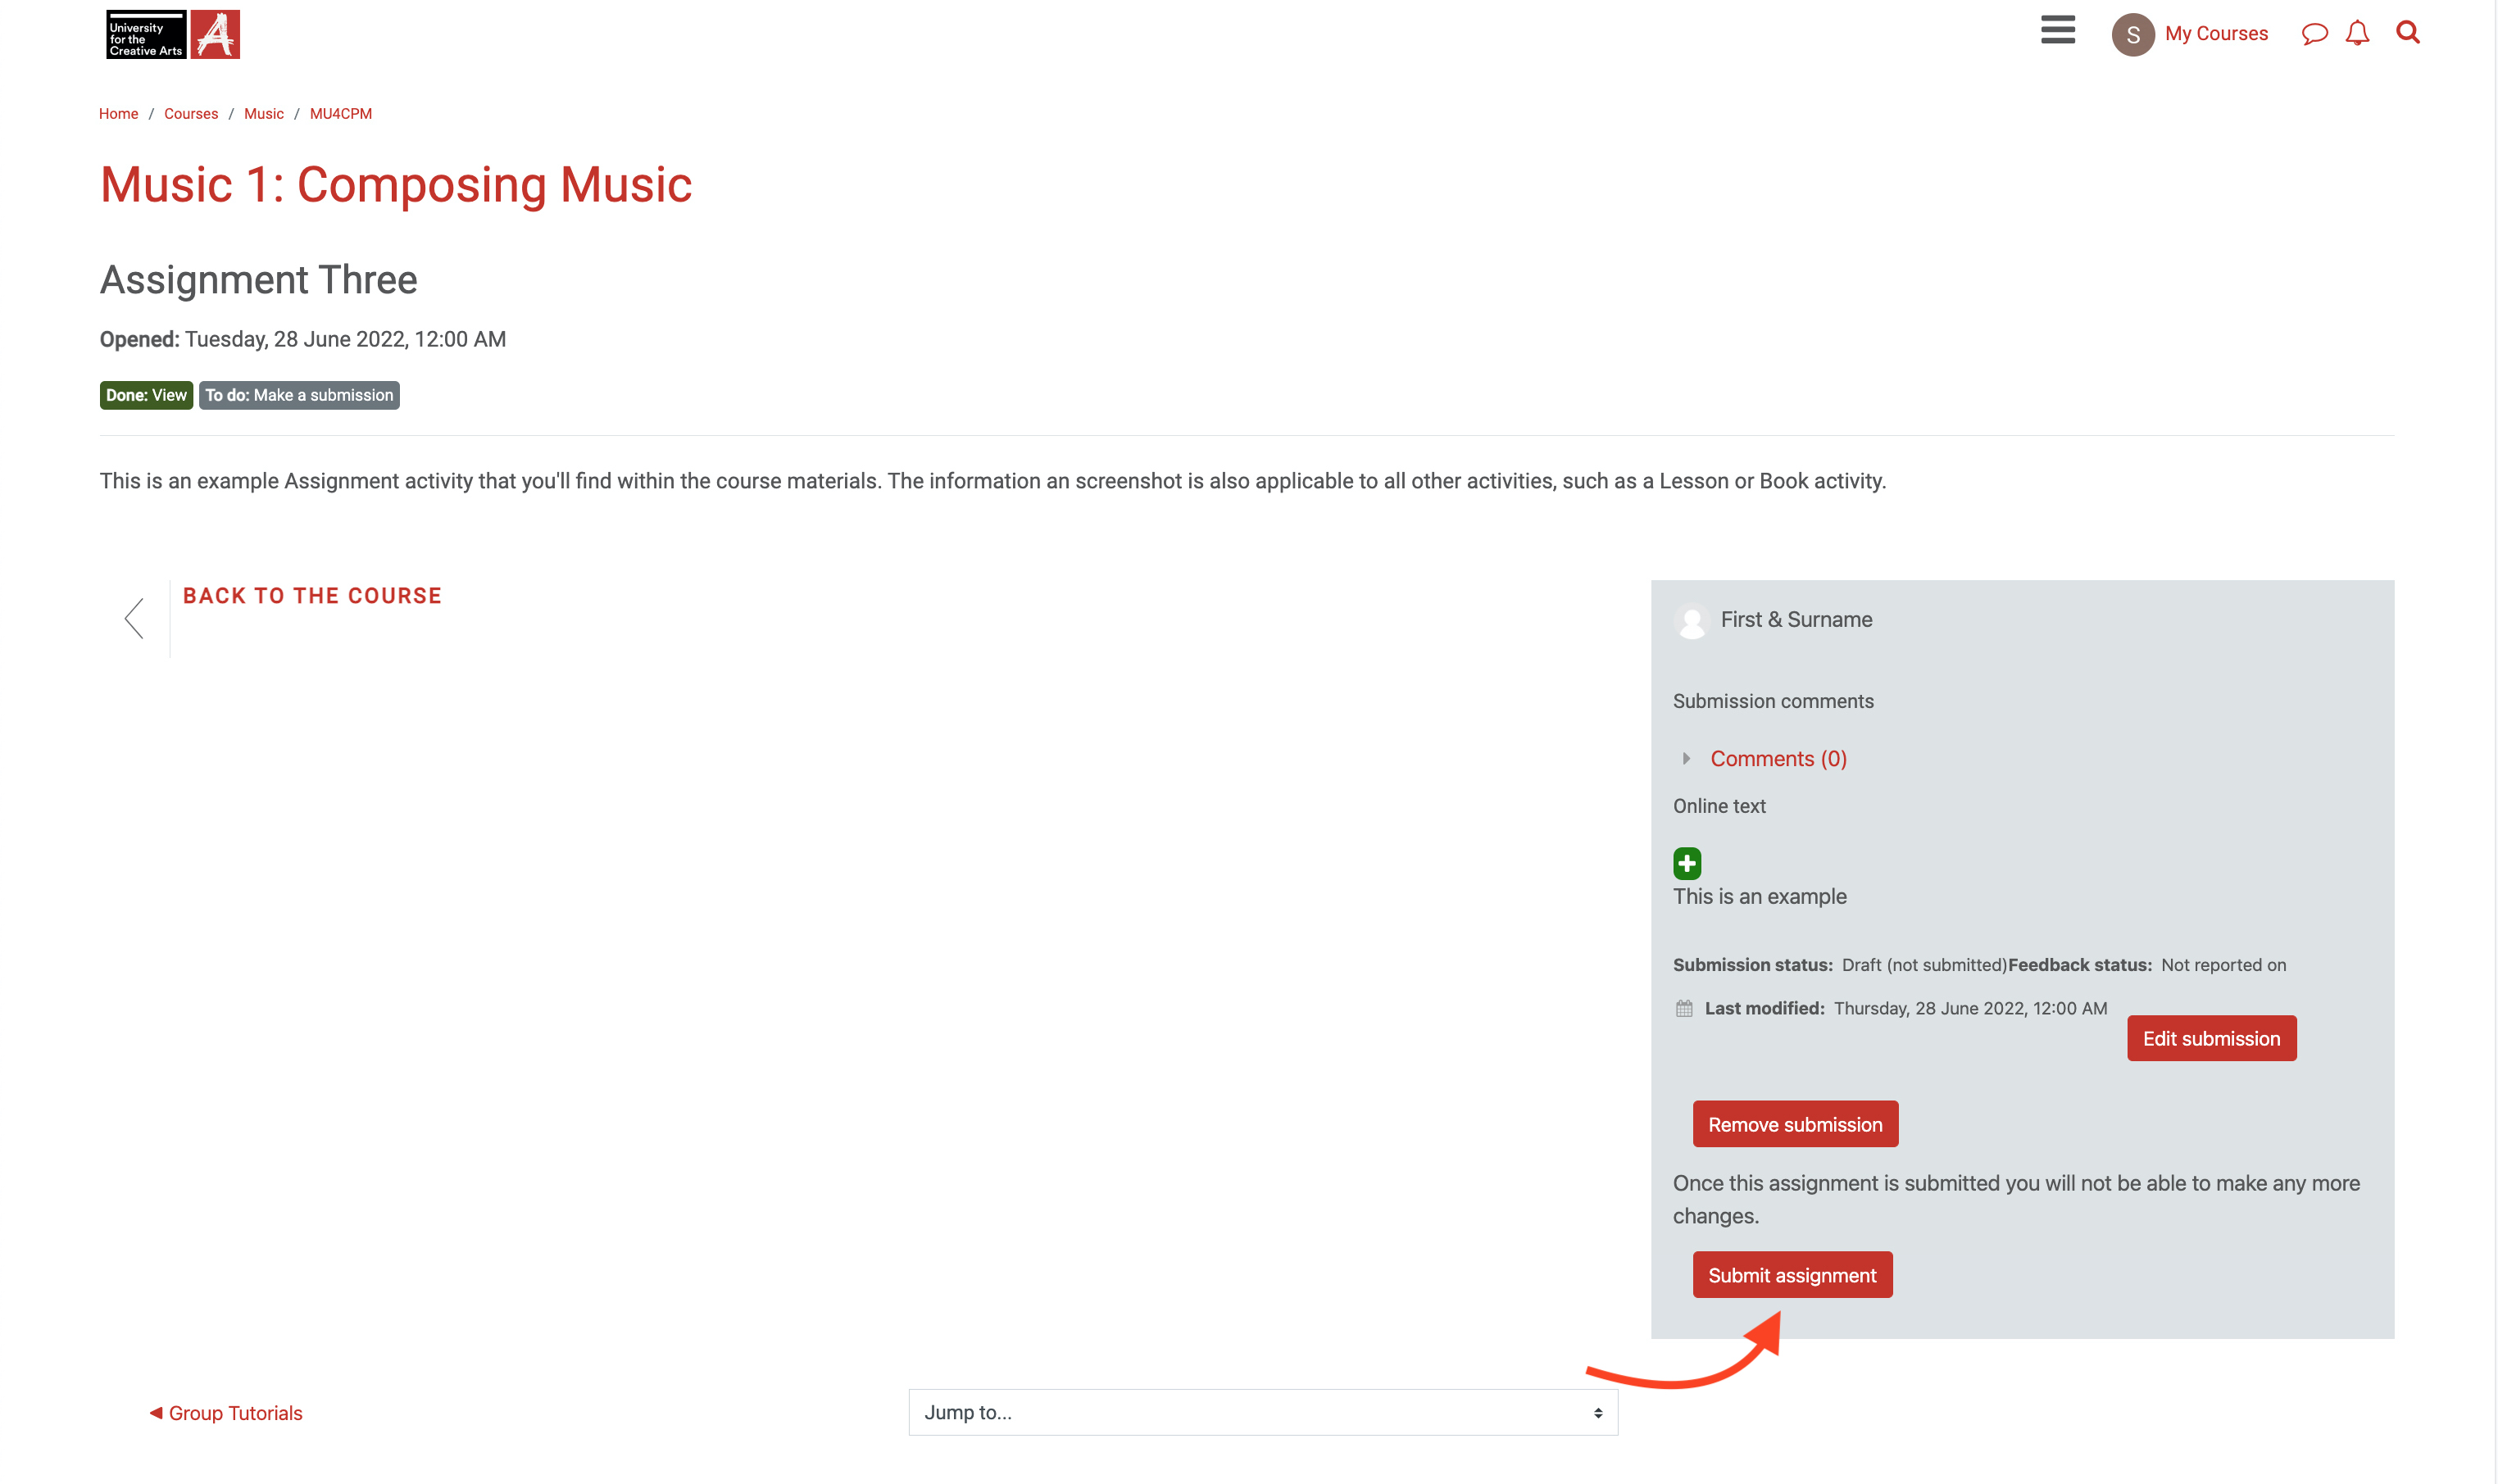
If done correctly, both you and your tutor will each receive an automated email confirming your assignment submission.
Video Demonstration
Should you find it helpful, the following Submitting Assignments video also demonstrates the process of submitting your assignment via OCA Learn.
Amending your Submission
In the event you've successfully submitted your assignment and later need to amend your submission, please contact the TEL Team, including the relevant assignment number and copying your tutor in the email. The TEL Team will then be able to revert your submission to draft status, whereby you'll be able to make any appropriate amendments before resubmitting.