Google Support & Guidance
| Site: | OCA Learn |
| Course: | Tech Support, Guidance & Workshops |
| Book: | Google Support & Guidance |
| Printed by: | Guest user |
| Date: | Tuesday, 14 July 2026, 8:45 AM |
Description
This activity contains support and guidance regarding your OCA email account and subsequent Google facilities, such as Google Mail, Google Drive and Google Meet.
Getting Started
Use the chapters available on the left to navigate to a specific topic, or read through the entire activity for a broader view of your OCA email account and subsequent features.
All information and guidance available throughout this activity is accurate and correct of June 6th 2024.
Once complete, continue through the remaining support and guidance sections before providing feedback, requesting additional guidance or reporting any mistakes using the Tech Support, Guidance & Workshops Feedback activity.
Google Homepage Interface
The following interactive Google Homepage Interface activity provides information regarding the Google homepage interface, and demonstrates the 'Gmail' option, Google Chrome Profiles and Google Account Profile icons. Begin by selecting any of the 'i' icons to find out more information about a specific option.
OCA Email Account
Upon enrolling with OCA and available in your welcome email, you’ll be provided with an OCA email address which consists of your first name and six digit student number, and can be used for email communication within OCA, including Head Office staff, your tutor and fellow students.
To access any OCA facility, such as OCA Learn and OCA Spaces, you’ll also first need to sign into your OCA email account. Without access to your OCA email account, you'll be unable to sign into or access any OCA facility. In the event you're unable to access your OCA email account, please visit the Password Reset sub-chapter or contact the TEL Team.
Signing into your OCA Email Account
Google & OCA email account
Your OCA email account uses Google Education and you’ll therefore need to use Google to sign into your OCA email account. If you haven't already done so, the TEL Team strongly recommends reading the information available in Google Homepage Interface chapter and familiarising yourself with the Google homepage before continuing.
This sub-chapter is divided into two parts and contains information applicable to both Desktop & Laptop Users, whom don’t have or aren’t signed into an existing Google account and should therefore continue to the first Single Google Account heading, and those who have and are signed into an existing Google account(s) and should therefore continue to the first Multiple Google Account(s) heading.
Furthermore, this sub-chapter also contains information applicable to Mobile & Tablet users, whom too don't have and aren't signed into an existing Google account and should therefore continue to the second Single Google Account heading, and those who have and are signed into an existing Google account(s) and should therefore continue to the second Multiple Google Account(s) heading.
Desktop & Laptop Users
Single Google Account
Signing In
Providing you don’t have or aren’t signed into an existing Google account, such as a personal Google account, you can access the Google homepage and select the blue ‘Login’ option - located in the upper right corner - where you’ll then be prompted to sign in using your OCA email address and password, both of which are available in your welcome email.
Signed In
Once signed into your OCA email account, you’ll be mandated to change your password to something more secure and familiar to yourself, subsequently followed by enabling Two Factor Authentication.
Multiple Google Account(s)
Signing In
In the event you have and are signed into another Google account(s), you can sign into your OCA email account by visiting the Google homepage and selecting the profile icon - located in the upper right - followed by the ‘Add Another Account’ option. Upon selecting this option, you’ll be prompted to sign in using your OCA email address and password, both of which are available in your welcome email.
For information regarding navigating the Google Homepage, please refer to the Google Homepage Interface chapter.
Alternatively, students using Google Chrome may wish to create a separate Google Chrome Profile, which can be used to keep your Google accounts and associated data separate.
Switching Accounts
Having successfully signed into another account and needing to transition between different Google accounts - for the purpose of accessing Google Mail or Google Drive, for instance - visit the Google homepage and select the profile icon - located in the upper right corner - where you can then select the appropriate account from the list of signed in users.
Selecting a different account is reflected by the different profile picture, which when selected, will display the name and email address associated with the selected and current Google account.
For information regarding navigating the Google Homepage, please refer to the Google Homepage Interface chapter.
As mentioned above and an alternative to switching between multiple Google accounts would be to use Google Chrome Profiles, which can be used to keep your Google accounts and associated data separate.
Signed In
Once signed into your OCA email account, you’ll be mandated to change your password to something more secure and familiar to yourself, subsequently followed by enabling Two Factor Authentication.
Google Chrome & Supported Browsers
Where possible, the TEL Team would greatly recommend using Google Chrome over any other web browser, and cannot otherwise guarantee compatibility with certain features, such as embedded Panopto video available within OCA Learn.
Google Chrome Profiles
Students using Google Chrome with multiple Google accounts may wish to create a new and separate Google Chrome Profile. This will allow you to keep your Google accounts and associated information, such as bookmarks, search history and saved passwords, separate. This will greatly help when logging into other OCA facilities, such as OCA Learn and OCA Spaces, as you’ll be automatically signed in and won’t need to select your OCA email account, thus greatly reducing the likelihood of encountering any issues when signing into any OCA facility.
For information regarding navigating the Google Homepage, please refer to the Google Homepage Interface chapter. And for more information and guidance on creating Google Chrome Profiles, please visit the following Google Support page.
Mobile & Tablet Users
As mentioned above, the TEL Team would also recommend mobile and tablet users also use the Google Chrome application, available for free on both Android and iOS.
Single Google Account
With the Google Chrome application downloaded and installed, navigate to the Google homepage and again select the profile icon, located in the upper right corner, whereby you'll be prompted to sign in using your OCA email address and password; both of which are available in your welcome email.
Multiple Google Account(s)
Unfortunately, Google Chrome Profiles aren't supported on either application and students using an existing Google account should therefore access their Google Account Options and select the 'Add Account' option, whereby you'll be prompted to sign in using your OCA email address and password, both of which are available in your welcome email.
Upon accessing any OCA facility, such as OCA Learn or OCA Spaces, users signed into multiple Google accounts will be prompted to select their OCA email account from a list of signed in users.
What is Two-Factor Authentication - or "2FA" for short?
Two-Factor Authentication, or "2FA" for short, is an additional method of security and used to ensure that your account and personal information remains private, safe and secure, by aiming to ensure no unauthorised access to your account. Should you find it helpful, the following Google Support page provides more information regarding the benefits of 2FA.
Why do I need to enable 2FA?
Per February 8th 2024, Two-Factor Authentication will be enforced for all students, effective February 29th 2024, and students will therefore need to enable a minimum of two authentication methods prior to February 29th. Thereafter, and effective February 29th, students who have not enabled a minimum of two authentication methods within this timeframe will be locked out of their account and will need to contact the IT Services to regain access. Alternatively and providing a mitigating circumstance applies, students may opt out of enabling 2FA, and will again need to contact IT Services to do so, however, will face several restrictions within their OCA email account; please refer to the What if I don't or opt not to enable 2FA?' heading for more information.
New students, enrolling March 5th 2024 or thereafter, will have thirty days, as of the date they first sign into their OCA email account, to also comply with enabling a minimum of two authentication methods, and will be prompted to enable 2FA throughout this timeframe. Students who do not enable a minimum of two authentication methods within the thirty day timeframe will also be locked out of their account and will need to contact the IT Services to regain access.
How do I enable 2FA and what are the authentication methods available?
The process of enabling 2FA will differ depending on the method(s) you opt to use, with multiple 2FA methods available and students free to use any combination of the following;
- Authenticator Application
- Google Prompt
Freely available for; - SMS or Voice Verification Codes
- Back Up Codes
The above methods are listed based upon the order in which they're recommended by IT Services, starting with the most recommended option.
Authenticator Application
The Authenticator Application isn't an option that's initially available upon signing into your account for the first time and when needing to set up 2FA for the first time - or while 2FA is disabled - and students preferring to use an authenticator application, such as the Google Authenticator app via their phone or tablet, will therefore first need to enable Google Prompt or SMS or Voice Verification Codes and complete the process of enabling 2FA before enabling the authenticator app via their Google Account Security Settings.
Upon accessing your Google Account Security Settings, next select the '2-Step Verification' tab followed by the 'Authenticator App' option. Meanwhile, download the Google Authenticator app, freely available via the Apple App Store or Google Play Store, and sign into your OCA email account using the app. Next, and within your Google Account Security Settings, select the 'Set up Authenticator' option, which will either require you to either; scan the on-screen QR Code using your phone, or enter the provided setup key. Thereafter and within the app, you'll encounter a six digit time based code which you'll need to enter within your Google Account Security Settings in order to verify and complete the 2FA set up process.
If done successfully, the 'Authenticator App' will show as one of the available and configured 2FA options within the 2-Step Verification page.
Thereafter, and when signing into your OCA email account in the future, you'll be prompted to open the Google Authenticator app, whereby you'll be presented with a six digit code, similar to the one encountered during the original set up process, which you can enter when prompted and following your account password.
The following Google Support page provides additional information and guidance for iPhone and iPad (iOS) and Android respectively.
Google Prompt
Google Prompt allows users to receive a notification via a phone and/or tablet, whereby you'll then be prompted to accept or deny the sign in request using your preferred - and potentially multiple - device(s).
iPhone or iPad (iOS)
If signing into your OCA email account while needing to set up 2FA for the first time - or while 2FA is disabled - start by signing into your OCA email account using a desktop computer or laptop and continue with the sign in process until you reach the option to enable 2FA. Available for iPhone 5 and above, and using a compatible Google App, such as the Gmail, YouTube, Google Account, Google Photos or Smart Lock App, you'll next need to sign into one of the aforementioned apps using your OCA email account.
Once signed into your OCA email account in both instances, using your desktop computer or laptop, next select 'See more options', located in the bottom left of the 'Enable 2FA' page, followed by 'Google Prompt', whereby you should see your phone and/or tablet listed in the list of supported device(s). Assuming this appears as expected, next select 'Continue', whereby the device will be registered on your account thereafter.
In the event you're already signed into your OCA email account, and/or need to retrospectively enable Google Prompt, access your Google Account Security Settings while simultaneously signing into your OCA email account using any of the aforementioned compatible apps. Once signed into your account using your preferred app, the Google Prompt option should now display as enabled and the default 2FA method within your Google Account Security Settings.
Google Prompt will function simultaneously across all - and as many - iOS device(s) that you're signed into.
Thereafter and when signing into your account in the future, you'll receive a notification within your preferred app, whereby you can accept or deny the sign in request.
Please note that you cannot customise which app(s) you receive the push notification via. For more information and guidance, please visit the following Google Support page.
Android
Using any eligible Android device, Google Prompts will be automatically be enabled once signed into your OCA email account.
If signing into your OCA email account while needing to set up 2FA for the first time - or while 2FA is disabled - start by signing into your OCA email account using a desktop computer or laptop and continue with the sign in process until you reach the option to enable 2FA. Simultaneously repeat this process using your Android device.
Once signed into your OCA email account in both instances, using your desktop computer or laptop, next select 'See more options', located in the bottom left of the 'Enable 2FA' page, followed by 'Google Prompt', whereby you should see your phone and/or tablet listed in the list of supported device(s). Assuming this appears as expected, next select 'Continue', whereby the device will be registered on your account thereafter.
In the event you're already signed into your OCA email account, and/or need to retrospectively enable Google Prompt, access your Google Account Security Settings while simultaneously signing into your OCA email account using your Android device. Once signed into your account using your device, the Google Prompt option should now display as enabled and the default 2FA method within your Google Account Security Settings.
For more information and guidance, please visit the following Google Support page.
SMS or Voice Verification Code
SMS or Voice Verification Codes allow students to receive a six digit verification code, similar to the ones encountered when using the Authenticator Application, via SMS (text message) or phone call. When prompted, students will then need to enter the six digit code, whereby you'll then have access to your account; this process works similar to using the Authenticator Application, however, is more susceptible to social engineering and requires cellular service.
To set up SMS or Voice Verification Codes when signing into your OCA email account and needing to set up 2FA for the first time, upon encountering the 'Enable 2FA' page, enter your preferred mobile number, followed by 'Continue'. Shortly after and depending on your preference, you'll then receive an SMS or phone call containing a six digit verification which you'll simultaneously need to enter when prompted. Once complete, SMS or Voice Verification codes will be enabled, all you'll need to repeat the process of entering the six digit code when prompted in the future.
Back Up Codes
Back Up Codes are intended to act as an emergency verification method and aren't recommended to be used as one of your two preferred methods.
Available via your Google Account Security Settings, Back Up Codes are an eight digit code which can be entered when prompted and in the absence of any alternate 2FA method, such as when you don't have access to your mobile device and cannot use an Authenticator App or receive an SMS or Voice Verification Code, for example.
Back Up Codes are available as a group of ten varying codes and can be stored digitally or physically, but must be accessed and stored outside of your OCA email account and prior to use. When prompted, you can then use any of the available ten codes, however, and once used, that particular code cannot be reused. Once all ten available codes have been used, students will need to manually refresh their available back up codes, taking note of the new and updated codes, whilst also ensuring to safely dispose and destroy of any previous unused code(s).
To access and enable Back Up Codes, first access your Google Account Security Settings and select the '2-Step Verification' tab, followed by the 'Back Up Codes' option. On the following page, next select the 'Get Back Up Codes' option, whereby and on the following page, you'll then find the series of ten, eight digit back up codes and may make note of however many code(s) and via however any preferred method. For example, you may prefer to print and store them in a safe location or download and store them within your device. The codes may then be used as and when needed.
What if I don't have a smartphone, want to provide my telephone number and/or cannot install an authenticator app?
Students who do not possess a smartphone may wish to explore the possibility of using SMS or Voice Verification Codes, alongside Back Up Codes as their second 2FA method.
Students who don't wish to provide their telephone number should explore the possibility of using an Authenticator App, and vice versa.
In the event of mitigating circumstances - for example but not limited to, not possessing a mobile device - students should contact IT Services and discuss the possibility of additional alternative option(s), or, and again by contacting IT Services, discuss the possibility of opting out of enabling 2FA entirely, however, the latter will impose restrictions within your OCA email account, as outlined beneath the What if I don't or opt not to enable 2FA?' heading.
What if I don't or opt not to enable 2FA?
Existing students enrolled before February 8th 2024, who do not enable 2FA prior to February 29th 2024 will be locked out of their account and will need to contact IT Services to regain entry. New students, enrolled on or after March 5th 2024, who do not enable 2FA within the first thirty days of signing into their OCA email account and when prompted to do so, will be locked out of their account and will need to contact IT Services to regain entry.
Students who would prefer not to enable 2FA entirely will first need to contact and inform IT Services, whereby the following restrictions will be imposed within the OCA email account;
- Restricted access to the OCA directory, thereby preventing services such as the recipients auto-fill and suggestions feature, available within Google Mail, and access to Google Contacts, therefore prompting students to manually know and enter an intended recipient’s email address.
Password Reset
In the event you’re not signed into and unable to sign into your OCA email account and require a password reset, please contact the TEL Team.
If you do have access to your OCA email account and would like to change your password, you can do so via your Google Account Settings, and selecting the 'Security' tab - located on the left - followed by 'Password'. Accessing your Google Account settings, you can also access and amend any personal information.
Account Retention
For information regarding the retention of your OCA email account and subsequent access to OCA facilities, information and data, please refer to the Data Retention Schedule, available on the Our Policies page. Please note that upon completing your degree and losing access to your OCA email account, you'll no longer be able to access and sign into any subsequent OCA facility such as OCA Learn or OCA Spaces.
Retention & Migration
This following information and guidance is particularly applicable to students who have completed a unit and/or their degree and wish to retain and migrate their work outside of OCA facilities.
Emails and Google Drive
Students who have completed their degree and are looking to retain any emails and/or files stored on Google Drive can complete the Transfer Your Content process. Following this process, students can automatically migrate their emails and/or any files stored on Google Drive to an external and personal Google account. For more information on this process, please visit the following Google Support page. Alternatively, and particularly applicable to students who do not have an existing and do not wish to create a personal Google account, you may instead with to Download Your Data
OCA Learn
Information and data stored on OCA Learn cannot be retained or migrated elsewhere.
OCA Spaces
Students who have completed their unit and/or degree may wish to retain and migrate their learning log(s) elsewhere, and in such instance can follow the information and guidance provided in the Exporting & Importing sub-chapter of the OCA Spaces Support & Guidance section.
Padlet
Students who have completed their unit and/or degree may wish to retain and migrate any personal Padlet(s) to a personal Padlet account, and in such instance can follow the information and guidance provided in the Import & Exporting a Padlet sub-chapter of the Padlet Support & Guidance section.
Panopto
Students who have completed their unit and/or degree may wish to retain and migrate any personal recording(s) stored on Panopto, and in such instance can follow the information and guidance provided in the Downloading Media sub-chapter of the Panopto Support & Guidance section.
Google Mail
Google Mail and the Google Mail App, freely available on both iOS and Android, are the two official Google email clients, however, after initially signing into your account using the official Google Mail client, you can use any other third party email client.
Accessing Google Mail
The following sub-chapters provide information and guidance regarding how to access your emails and Google Mail using a Web Browser, the official Google Mail App or a Third Party Email Client.
Web Browser
Users signed into multiple Google accounts and not using separate Google Chrome Profiles, may need to switch accounts before continuing.
Having accessed your OCA email account, you can access your emails via Google Mail or the ‘Gmail’ option, the latter is available in the upper right corner of the Google homepage, and as demonstrated in the Google Homepage Interface chapter.
Google Mail App
For mobile and/or tablet users, the TEL Team would recommend downloading the official Google Mail App, available for free on both iOS and Android, where once downloaded, you’ll be prompted to login using your OCA email address and password.
In the instance you haven’t previously signed into your OCA email account, you may first need to sign in using a web browser, whereby you'll be prompted to complete the mandatory password change. Only after having changed your password can you continue to login using the Google Mail app or a third party email client.
For more information regarding signing into your Google account using an official Google client, please visit the following Google Support page.
Third Party Email Client
Students signing into their OCA email account using a third party email client, such as Microsoft Outlook or Apple Mail, will first need to sign into their account using a web browser. Thereafter, the following Google Support page provides information and guidance on how to sign into your OCA email account using a third party email client.
Hyperlinked email addresses and preventing the use of third party email clients
The following guidance is only applicable to those using Google Chrome, and would like to prevent third party email clients from opening upon selecting a hyperlinked email address. For example and in the instance you’d like to prevent the following techsupport@oca.ac.uk email address from opening using the default Apple Mail or Microsoft Outlook application, and instead open within the Google Mail interface.
The following process only prevents the use of third party email clients, instead using Google Mail. Additionally, it is not possible to force Google Chrome into using a specific email account upon selecting a hyperlinked email address, and the following process therefore doesn’t guarantee the use of your OCA email account, and may instead default to a personal Google account based on the following factors;

To begin and within the Google Chrome interface, begin by selecting the kebab menu (three dots) - located in the upper right corner - followed by ‘Settings’. On the following page, next select ‘Privacy & Security’ - located in the left hand menu - followed by ‘Site Settings’, ‘Additional Permissions’ and ‘Protocol Handlers’. Again on the subsequent page, next enable the ‘Sites can ask to handle protocols’ option.
Alternatively and to quickly navigate to the appropriate setting, you can also copy and paste the following string of italic text into the address bar within Google Chrome; chrome://settings/handlers
Next conclude by navigating to Google Mail and selecting the ‘Service Handlers’ (two overlapping diamonds) icon - located in the far right of the address bar - and select ‘Allow’.
Having followed this process correctly, any hyperlinked email addresses, such as techsupport@oca.ac.uk, will now open using the Google Mail interface.
Additional tips for using Google Mail are available via the following Google Support page; additional guidance on this particular process is also available via the aforementioned Google Support page and located beneath the “Open Chrome email link in Gmail” heading.
Google Drive
Included with your enrolment and accessible via your Google account, is a shared college-wide 100TB Google Drive cloud storage and use of the integrated Google applications.
Google Drive and the available cloud storage can be used to store and save files online which can be simultaneously accessed across multiple other devices, such as a smartphone, tablet or separate computer, and further shared with other collaborators.
The integrated Google Applications - Google Docs, Slides and Sheets - form Google Drive’s Office Suite, similar to Microsoft Office, and are also stored and accessible via Google Drive, where they too can also be simultaneously accessed across multiple devices, while offline and shared with collaborators.
For mobile and/or tablet users, you can also download the Google Drive application, freely available on iOS and Android, whereby you can access any files stored on Google Drive, including the ability to use any of the integrated Google Applications.
Where possible, the TEL Team strongly promotes and recommends the use of Google Drive and integrated applications, as opposed to Microsoft Office and OneDrive.
Accessing Google Drive
Information and guidance on how to access Google Drive and subsequent integrated applications can be found via the following Web Browser and Mobile or Tablet sub-chapters.
Web Browser
Users signed into multiple Google accounts and not using separate Google Chrome Profiles, may need to switch Google accounts before continuing.
Having accessed your OCA email account, first navigate to the Google homepage and select the Google Applications Menu - (grid of nine dots), located in the upper right corner and as demonstrated in the Google Homepage Interface chapter - followed by the ‘Drive’ option.
Selecting the Google Apps Menu, you can also access any of the integrated Google Applications - Google Docs, Slides and Sheets - to create a new or access an existing project.
Mobile or Tablet
Students using a mobile and/or tablet to access Google Drive should first download the Google Drive App, available for free on both iOS or Android.
With the Google Drive App downloaded, you’ll next need to sign in using your OCA email address, where once signed in, you’ll have access to any existing file(s). To access your files using any of the integrated Google Applications, you’ll also need to download the respective Google Docs, Google Slides or Google Sheets application, whereby you’ll then be able to access and edit them as standard.
Students using a mobile and/or tablet can also access Google Drive using a web browser, but may encounter compatibility issues and is therefore not recommended.
Google Drive for Desktop
Use Google Drive for Desktop to automatically synchronise specific files and/or folders available on your desktop with the online cloud storage available on Google Drive. This can be particularly helpful for those;
- Preferring to back up their work online;
- Access their work via a different device, such as a different desktop, laptop or mobile;
- Access Google Drive files offline and without an internet connection;
- Prefer to use non Google supported software, such as the Microsoft Office suite.
To begin, download the Google Drive for Desktop software, and follow the Install and set up Google Drive for Desktop instructions. Once installed, the following Google Support pages also provide guidance regarding how to Access your Files and Manage your Files.
Integrated Google Drive Applications
The integrated Google applications are similar to Microsoft Office, and provide word processing - Google Docs - slideshow - Google Slides - and spreadsheet - Google Sheets - functions, available immediately within your web browser, and without the need to download and install any additional software.
All three applications also support offline editing, whereby they can be edited without an internet connection, versioning and collaboration. The use case for each application has been outlined below;
Google Docs: Word Processor, similar to Microsoft Word, and can be used to compose documents. For more information and support regarding Google Docs, please visit the Google Docs Support page.
Google Slides: Presentation software, similar to Microsoft PowerPoint. For more information and support regarding Google Slides, please visit the Google Slides Support page.
Google Sheets: Spreadsheet software, similar to Microsoft Excel. For more information and support regarding Google Sheets, please visit the Google Sheets Support page.
For further information regarding any of the integrated applications, please visit the following Google Support page.
Google Groups
OCA uses Google Groups to facilitate student and teaching team discussion within both the course unit and degree pathway.
Accessing the Google Groups application via the Google Apps menu - as explained in the Google Homepage Interface chapter - students can view and respond to ongoing or start a new discussion. While not restricted, discussion may regard feedback or advice, course support or group work. In most, if not all cases, the degree pathway group is limited to announcements from the teaching team and students are unable to post or reply.
As opposed to accessing the Google Group, students can also use the group email address to respond or create discussion. The group email addresses will take the following format;
Course Unit: [ShortCourseCode]@oca.ac.uk. For example, Creative Arts 1.1: Experience Creative Arts is, ca4eca@oca.ac.uk.
Degree Pathway: BA[DegreeAbbreviation]@oca.ac.uk. For example, the Music Degree pathway is, bamu@oca.ac.uk.
By default, all students will also receive emails sent to either group in their personal inbox, thus preventing the need to access the Google Group in order to view correspondence.
Google Meet
Accessible via the Google Applications Menu, as explained in the Google Homepage Interface chapter, Google Meet is a video conferencing application, similar to Zoom, and can be used to facilitate tutorials, group work and other ad hoc meetings with fellow students, teaching or office staff.
Using your OCA email account, students are able to host an unlimited number of meetings with upto 100 participants for a duration of 24 hours without the need for an additional licence. Google Meet is also compatible across multiple devices, supports live captioning and screen sharing.
Creating & Joining a Google Meet
This sub-chapter contains information regarding how to create a Google Meet and join a Google Meet.
Create or schedule a Google Meet
To create or schedule a meeting using Google Meet, access the Google Meet application via the Google Apps Menu, as explained in the Google Homepage Interface chapter, and select the ‘New Meeting’ option. Upon selecting the option you’ll be able to schedule a meeting for a later time and date, start an instant meeting, or schedule a meeting using Google Calendar.
Join a Google Meet
To join a meeting using Google Meet, the designated host will need to send you the joining information - either the Google Meet ID or PIN - whereby you can enter the Meet ID in the Google Meet interface or call the appropriate Google Meet Dial In number and enter the PIN. Alternatively and in the event the meeting was scheduled using Google Calendar, you can access the Google Calendar application via the Google Apps Menu - as explained in the Google Homepage Interface chapter - and select the scheduled appointment followed by the ‘Join with Google Meet’ option.
For more information and support using Google Meet, please visit the following Google Support page.
The following interactive Google Meet Interface activity provides information regarding the various options and icons available within Google Meet. Select any of the 'i' icons for more information about a specific option or icon.
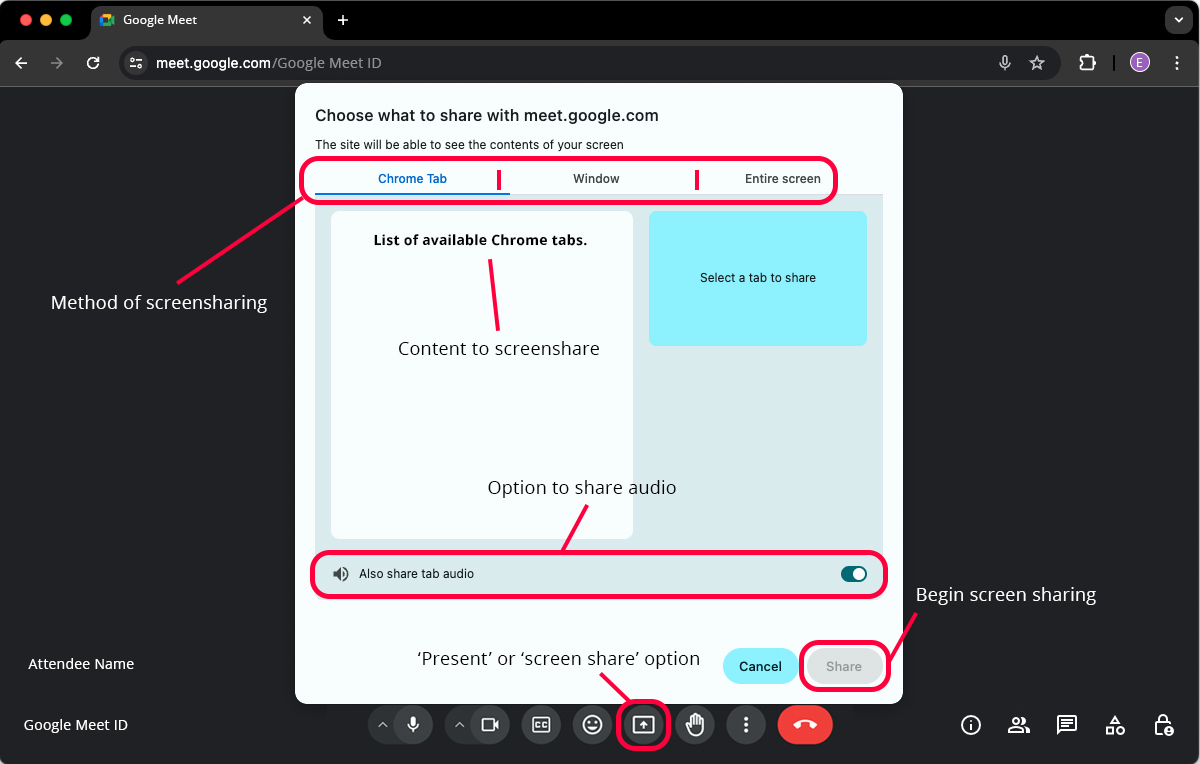
Screen Sharing
By default, screen sharing is enabled for all users unless manually disabled by the Google Meet host or co-host. To begin screen sharing, select the ‘Present’ or ‘Screen share’ option, as outlined in the Google Meet Interface sub-chapter. Upon selecting the ‘Present’ option, you’ll then be prompted to select how you’d like to screen share, and can range from a specific and singular Chrome tab, an entire window - including but not limited to Google Chrome - or your entire screen. In opting to share a particular window, you can also screen share a third-party programme, such as but not limited, Adobe Photoshop, a PDF or image, for example. After deciding how you’d like to share your content, you’ll then be prompted to select the specific Chrome tab, application or screen that you’d like to share, and can subsequently finish and start screen sharing by selecting the ‘Share’ option.
Sharing Audio
While using Google Meet, the option to share audio is limited to using Chrome tabs, and any content not stored or accessible via your web browser will therefore need to be uploaded to Google Drive or Panopto, for example, beforehand. Enabled by default and upon selecting your preferred Chrome tab but prior to selecting the ‘Share’ option, you’ll need to ensure the 'share tab audio’ option is selected; see the screenshot below for reference. Subsequently, any audio available and played via the shared tab will also be played to all participants within the Google Meet.
Accessibility Options
Immediately available within Google Meet are several accessibility options, as follows;
Closed Captions
Closed captions, also known as subtitles, provide a text-based supplement or alternative to an audio conversation taking place within Google Meet, and can further be used to translate a conversation into multiple other languages. Closed captions are enabled on an individual user-by-user basis and are solely visible to the individual user.
To enable closed captions, select the 'Closed Captions' option ('CC' icon), located in the centre and along the bottom row of available options within Google Meet. Alternatively, closed captions can be enabled and disabled by selecting the 'C' key on your keyboard. In either instance, a prompt will appear within Google Meet to confirm that closed captions have been enabled or disabled.
Please refer to the interactive Google Meet Interface activity for more information on the available options. Additionally, please refer to the following Google Meet Support page for more information regarding closed captions, including the various languages available for translation.
Transcripts
Unless specifically enabled for all users within a particular and individual Google Meet, transcripts - and thereby the transcripts option - are available only to the Google Meet host and any assigned co-host(s), and provide a text-based summary to all audio conversations which took place within a Google Meet but not including any text-based messages sent via the chat feature. In essence, transcripts are a non-live version of closed captions and contain all of the conversation(s), not a singular phrase or sentence.
Transcripts are currently only available when using a desktop computer or laptop, and can be enabled individually and by selecting the 'Activities' option followed by 'Transcripts', or are automatically, and by default, enabled upon recording a Google Meet. Transcripts cannot be paused but can be stopped and restarted, and thus creating a new and separate transcript. Once manually stopped or upon completion of a meeting, transcripts are automatically saved to the host's Google Drive and are subsequently attached to the Google Calendar event, assuming the meeting was created within Google Calendar, and accessible to all invited attendees. Additionally and once available, all invitees are notified of the availability of the transcript(s) via email.
Please refer to the interactive Google Meet Interface activity for more information on the available options. Additionally, for more information regarding transcripts, please refer to the following Google Meet Support page.
Push to Talk
Once enabled, push to talk will, by default, mute the user's microphone, requiring them to push and hold the spacebar key on their keyboard in order to unmute their microphone. To mute your microphone again, release the spacebar. This feature maybe particularly useful for users whom prefer to remain muted for large durations of a meeting, speaking at random or sporadic intervals.
Push to talk is disabled by default and requires the user to access the 'Settings' option, and within the 'Audio' tab, enable the 'Push to talk' option. If enabled, this option solely applies to the specific Google Meet and doesn't apply to all future meetings.
Please refer to the interactive Google Meet Interface activity for more information on the available options.
Remove Video Distractions
Remove one or multiple user(s) video feed from your Google Meet, thus allowing you to focus more on specific participant(s). Removing a participant's video feed doesn't notify the affected user and the change is solely specific to yourself.
To remove a user's video feed, select the 'Participants' option, located in the lower right corner, followed by the 'Options' (three dots icon), located immediately to the right of the desired user, and 'Remove Video Feed'. You can repeat this process to later re-enable a user's video feed, if desired.
Please refer to the interactive Google Meet Interface activity for more information on the available options.
Pair Tiles
The pair tiles feature allows users to pair their video feeds within a particular Google Meet; this maybe particularly useful for a user and their sign language interpreter, for example. Once paired and once either or any of the paired participants speak, both video feeds will be visible and highlighted to all other participants, further combining them within any closed captions, if enabled.
Keyboard Shortcuts
While using Google Meet, the following keyboard shortcuts allow users to perform various commands and actions using their keyboard rather than selecting the relevant option from within the Google Meet interface. Please note that the following is a list of applicable commands and actions and isn't an exhaustive list; for a complete list of keyboard shortcuts, please refer to the following Google Meet Support page.
| Google Meet Command or Action | Mac | Windows & Chrome OS |
|---|---|---|
| Announce who is currently speaking | Ctrl + Cmmd + s | Ctrl + Alt + s |
| Announce current information about the room | Ctrl + Cmmd + i | Ctrl + Alt + i |
| Announce recently received reactions | Ctrl + Cmmd + x | Ctrl + Alt + x |
| Google Meet Command or Action | Mac | Windows & Chrome OS |
|---|---|---|
| Show and hide captions | c | c |
| Turn camera off and on | Cmmd + e | Ctrl + e |
| Mute and unmute microphone | Cmmd + d | Ctrl + d |
| Increase the number of participant tiles (or video feeds) | Ctrl + Cmmd + k | Ctrl + Alt + k |
| Decrease the number of participant tiles (or video feeds) | Ctrl + Cmmd + j | Ctrl + Alt + j |
| Show and hide the Google Meet chat | Ctrl + Cmmd + c | Ctrl + Alt + c |
| Show and hide participants list | Ctrl + Cmmd + p | Ctrl + Alt + p |
| Raise and lower your (digital) hand | Ctrl + Cmmd + h | Ctrl + Alt + h |
| Minimise and expand your video | Ctrl + Cmmd + m | Ctrl + Alt + m |
| Push to talk (unmute) | Press and hold spacebar to unmute. Release to mute. | Press and hold to unmute. Release to mute. |
For MacOS users, "Cmmd" is defined as the ⌘ key on an Apple keyboard.